

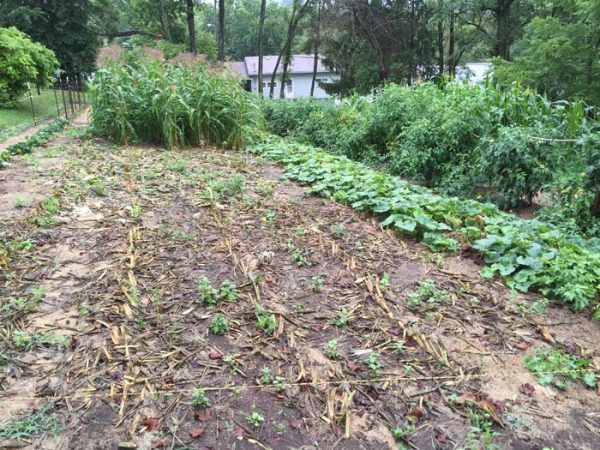
Betty’s Garden mid-August. The first two plantings of corn have been harvested
Welcome to the August issue of Betty’s Garden Diary. In this issue of Betty’s Garden Diary, we will discuss what is happening in the garden, but most of this issue will be devoted to preserving the crops that we have grown. Right after we finished putting together the July issue, the weather turned hot and dry, so Betty’s Garden experienced three weeks of drought which left a small impact on the garden. That impact is the most visible on the ears of sweetcorn from the third planting. When the drought hit, that corn was just starting to silk. At that stage, corn needs moisture to pollinate. The male part of the plant where the pollen is produced is the tassel. At the ear, there is one strand of silk for each kernel of corn. After a grain of pollen falls onto the silk, it grows down the full length of the strand of silk and fertilizes that egg thereby forming a kernel of corn. If the weather is extremely dry, some of the silks do not have enough moisture to enable the pollen to grow down the silk to the eggs thereby causing them to fail to produce kernels. Since the silks at the tip of the cob are the last to emerge, they are usually the ones that fail to produce kernels, resulting in ears of corn with no kernels on the top inch or so of the cobs.
Because of the hot, dry weather in mid-July, we set up the drip irrigation system on our tomatoes, but the flow from Court Spring was only a trickle which was the slowest we have seen it in the last 38 years, so we could not water them as much as we wanted. Fortunately, God watered the garden for us on July 30 and saved everything. Our first two plantings of sweetcorn have come and gone. We chopped those stalks into six inch sections and left them on the ground. Our sugar snap peas have also gone by, so we took the vines down from the pea fence and chopped them up using our riding lawnmower. After they dry, we will use our lawnmower to chop the cornstalks finer before tilling them into the soil this fall. Our cabbage plants are now producing secondary heads some of which have been large enough to harvest for slaw. If you are planning to grow some late cabbage, now is the time to seed it into your garden. Keep it watered well to promote germination. In addition to the small cabbages, we are harvesting okra, zucchini, onions, tomatoes, corn, cucumbers, green beans, peppers, beets, and muskmelons.
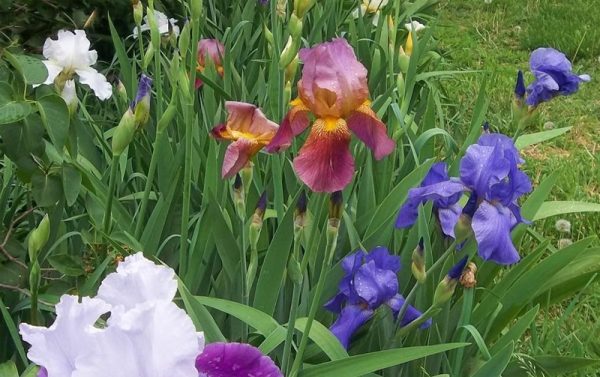
Bearded Irises
Along WV Rt. 88 in front of our house, we have a row of hybrid bearded irises. Those irises bloomed in April and May at which time we removed all of the stalks that held the blooms so that the plants did not produce seeds and all of the energy went into the rest of the plant. After the blooms were gone, the iris plants continued to grow until the weather turned hot and dry in July. During the hot and dry part of the summer, bearded irises enter a dormant phase as their growth slows to almost a standstill. That dormant phase usually occurs during July, August, and September. For that reason, irises are dug, divided, shipped, and planted at this time of year.
Bearded irises grow from rhizomes which are enlarged horizontal underground stems. As the plants grow, those rhizomes branch out and expand. Over time, the clusters of rhizomes get overcrowded with some rhizomes crossing over or under others. In addition, old rhizomes die and some rhizomes become infested with iris borers. For all of those reasons, iris experts recommend lifting and dividing bearded irises every few years. Since iris rhizomes grow just below the soil surface, the tops of the rhizomes are usually visible at the soil surface, so determining the size of the rhizome clusters is fairly easy.
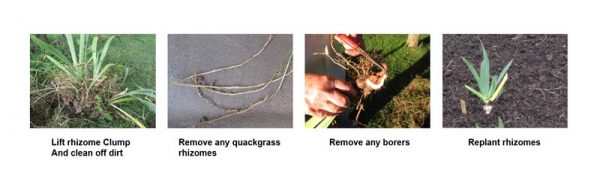
Lifting, dividing, and replanting bearded irises
To divide the iris plants, begin by cutting back each leaf set to a four to five inch fan. Using a spading fork or shovel loosen the cluster of rhizomes from the soil on all sides keeping the shovel or fork three or four inches back from the edges of the cluster to prevent cutting the roots too closely. I like to divide irises when the soil is very dry so that the soil falls off of the rhizome clusters easily. After loosening the rhizome cluster, lift it out of the bed and then remove all of the soil. If necessary, use a garden hose to clean off all of the soil. Examine the rhizome cluster carefully for quackgrass rhizomes and remove any that you find. The quackgrass rhizomes look very much like iris roots, so they are easy to miss. You will notice that the leaves grow on the ends of the iris rhizomes at the perimeter of the cluster. Carefully break off the rhizomes containing the sections with the leaves. If possible, I like to keep two or three inch long portions of the rhizome which include two or three leaf sets. Discard any sections of rhizome which have no leaves because they won’t grow. Also, discard any rotted or dried sections of rhizome. Carefully examine the rhizomes for borers. If you feel a soft spot in a rhizome, it likely has a borer inside of it. Use a sharp knife to cut it open and remove the borer which will be a large white grub. After you do so, use a garden hose to wash out the hole where the borer was removed and then allow it to dry before planting that rhizome. After you divide your irises, you will find that you have way more plants than you are going to need to replant the beds, so you can share them with friends.
If you have been given or have purchased some iris rhizomes and are planting them for the first time, look for a well-drained location that gets plenty of sun. Irises grow well on hillsides and banks. Loosen the soil and plant the irises so that the tops of the rhizomes are at or very slightly below the soil surface. They are going to grow in the direction of the leaf fan, so we like to plant them in clusters of three rhizomes oriented in different directions like the points of a triangle. Before you replant irises in an old bed, spade up the soil to be sure there are no old rhizomes containing borers left in the ground and to remove any quackgrass rhizomes or weed roots. Be sure to completely remove all plant debris from the bed because iris borer eggs overwinter on old plant debris. You can fertilize the bed, but avoid any fertilizer that adds extra nitrogen to the soil and do not over fertilize the bed. Excess nitrogen will result in lots of foliage with no blooms.
Bearded irises are often found around old abandoned homestead sites. Typically those irises are either purple or yellow. Those are the heirloom varieties. Older folks will remember people calling those heirloom irises “flags.” The rhizomes on the heirloom varieties are small and hard, so they resist the borers quite well which explains how they can survive for decades at old home sites in spite of being totally neglected.
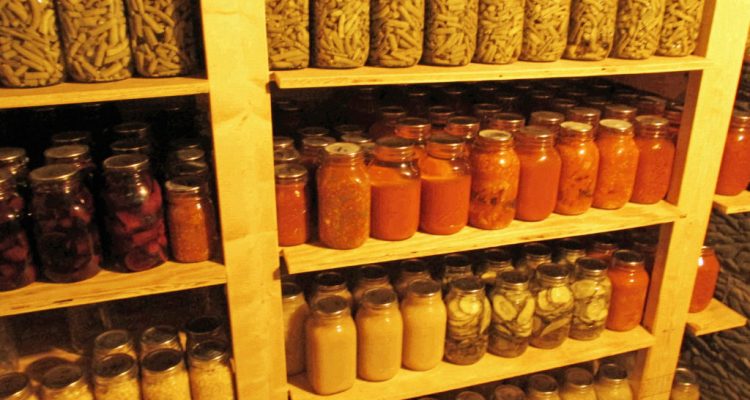
Back in the vegetable garden, the harvest is on. We have canned a total of 77 quarts of green beans from our first three pickings. We have also canned and frozen sweetcorn and we have frozen several packages of okra for use in gumbo this winter. We canned the sweetcorn in pint jars for use in vegetable soup. Canning sweet corn gives it a sort of nutty flavor which is okay in soup, but we prefer the frozen corn for the table. We would freeze it all, but our freezer space is limited. We have canned just over eighty quarts of whole tomatoes and tomato juice so far this summer. In addition to the tomatoes and sweetcorn, we have canned 25 quarts from the first batch of sauerkraut. We also made dill pickles and mustard pickles using some of our cucumbers. Both Betty and I grew up on small farms in Ohio where our families had large gardens which provided a major part of our food supply. Canning and freezing what the gardens produced was a normal part of our lives, so we continue to do so today. The big advantage in preserving the bounty of your garden is knowing what chemicals were used or not used to produce that food.
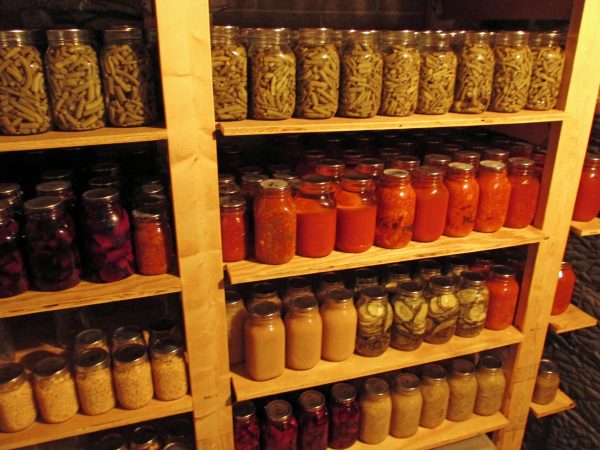
The canning jar shelf in our basement.
The next few lines of text will describe how we freeze or can things from our garden. However, you need to do your homework if you are preserving food for the first time. Be sure to practice basic food safety in preparing your fruits and vegetables for canning or freezing. Make sure all of your food preparation areas and all of your tools are clean and sanitized. Be especially careful to avoid cross contamination from raw meat or poultry and don’t forget to wash your hands often. Although the information in this document is taken from valid sources, do not use this document as your sole source of information about freezing and canning.
Freezing is the easiest way to preserve what your garden produces. Some crops can be washed and frozen without any additional preparation. Others need to be cooked or blanched. We freeze both green and hot peppers for cooking. All we do is wash them and then remove the stems and seeds. Then, we cut them up and spread them out onto a cookie sheet to freeze. After they are frozen, we just put them into zipper bags. Sometimes, Betty will also make and freeze stuffed peppers. We freeze okra for gumbo in a similar way. After washing it, we cut it into pieces and toss them into zipper bags to freeze. Onions for cooking can be frozen in the same way. Just be sure to seal them into zipper bags before putting them into the freezer to keep everything in the freezer from tasting like onions! To freeze sweetcorn, we fill a large cookpot with ears of corn and add a couple of inches of water in the bottom. Then, we cover the pot and steam the corn until it is completely cooked. After cooling it with cold water and allowing it to drain, we cut it off the cobs and freeze it in zipper bags. Air is the enemy of frozen foods, so press out all of the air before sealing the zipper bags. Make sure that the bags stay flat and square so that they will stack nicely in the freezer. You can also freeze corn on the cob, but doing so uses a lot more freezer space and it is more difficult to get the air out of the packages.
We freeze peppers and okra raw and corn fully cooked, but some foods need to be blanched instead of raw or fully cooked. Blanching involves cooking the vegetables briefly in boiling water and then chilling them in cold water. For example, peas, lima beans, green beans and sugar snap peas should be blanched in boiling water for three or four minutes and then chilled in cold water to stop the cooking before draining and freezing them. Blanching destroys enzymes in the beans or peas that would degrade the quality of those foods even while they are frozen. We freeze our extra sugar snap peas, but we prefer to can our green beans.
Home canning is a safe and efficient way to preserve food from the garden if it is done properly. However, home canned foods can contain deadly toxins if the proper procedures are not followed. For the purpose of home canning, the USDA National Center for Home Food Preservation classifies foods as either “High Acid” or “Low Acid”. They classify foods with a pH of under 4.6 as high acid and foods with a pH of 4.6 or above as low acid. Here is a great chart from the FDA indicating the pH of common foods. A microorganism called clostridium botulinum poses a deadly threat in improperly canned low acid foods. Clostridium botulinum exists as either bacteria or spores. It produces a toxin (Botox) which causes a deadly disease called botulism. Botulinum spores exist in the soil and on most garden foods. They are usually harmless and the botulinum organism does not grow in high acid foods. However, botulinum can grow very quickly in improperly canned low acid foods. Boiling water is not hot enough to destroy botulinum spores. Therefore, low acid foods must be processed in a pressure canner at the pressure and for the amount of time recommended by the USDA. Increasing the pressure raises the temperature in the canner to 250 degrees or more which is hot enough to destroy the botulinum spores. Even if you follow the pressure canning recommendations, the USDA also recommends that you boil home canned low acid foods for at least 10 minutes to destroy any botulinum toxin before tasting or consuming those foods. We always follow that recommendation.
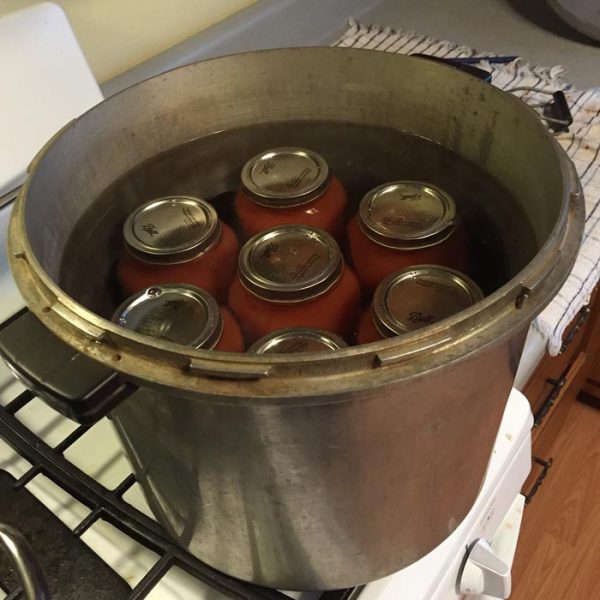
Our pressure canner without the lid. We were canning tomatoes when this was taken.
To be safe, we use a canner with a pressure gauge so that we can maintain an accurate pressure level during the processing of our low acid foods. Another thing that impacts the temperature in the canner is the altitude at which the food is processed. As the altitude increases, the temperature at a given pressure decreases. The Ball Book and the USDA both provide charts for increasing the processing pressure to compensate for increases in altitude. For green beans and corn at an altitude of 1000-2000 feet, the recommended processing pressure is 10 PSI. By checking a USGS topographic map, I determined that the altitude at our house is about 1200 feet. Just to be extra safe, we process our low acid foods at 12-13 PSI.
To prepare green beans for canning, begin by washing the beans to remove any dirt, flower parts, grass, etc. Then, remove the stem ends and tales along with any spots or insect damage. Use a large knife to cut them into bite sized pieces and then add them to clean quart jars filling the jars to the bottom of the neck which provides one inch of head space. When you fill the jars, run a finger around the lips of the jars to check for smoothness. Discard any jars with rough or chipped lips because they will not seal properly. Add a scant teaspoon of canning salt to each quart (Optional) and then fill the jars to the neck with boiling water. Remove any air bubbles by working a butter knife around in the jar. If necessary, add or remove boiling water to maintain the one-inch head space. While you are removing the air bubbles, use a couple of inches of boiling water in a saucepan to heat the lid flats for a couple of minutes. After using a damp cloth or paper towel to clean the jar lips again, remove the flats from the boiling water and place them onto the jars. Add the rings and tighten them snugly being careful not to overtighten them. If they are overtightened, the steam cannot escape from the jars during processing and the flats will warp or the jars will break. After processing the jars as instructed, wait until the pressure in the canner goes down completely and then carefully remove the jars and set them onto a dishtowel on the counter or table with a little space between the jars to allow them to cool. We let the jars cool overnight before removing the rings. After removing the rings, use a grease pencil or permanent marker to put the year on the lid and then place the jars on shelves in a cool dark place for storage. To can sweetcorn, start by cooking the corn and removing it from the cobs. Then, pack the corn into the jars to within one inch of the top, add boiling water and then process the jars following the time and pressure recommendations indicated in the chart from the Ball Blue Book or the USDA. We always wipe the threaded area on the filled canning jars with a damp cloth or paper towel before putting them on the shelf.
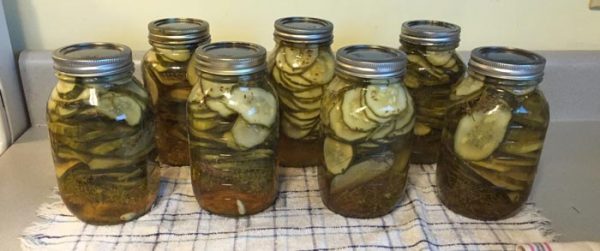
Homemade dill pickles
Dill pickles, sauerkraut, pickled beets, and tomatoes are some of the high acid foods that we can. Botulinum does not grow in canned foods with a pH below 4.6, so those foods can be processed in boiling water and the processing times are usually shorter than those for low acid foods. Dill pickles and pickled beets contain vinegar which has a pH of around 3.0. Sauerkraut contains lactic acid which is what makes it sour. Homemade sauerkraut has a pH of around 3.5. Tomatoes and tomato juice contain citric and ascorbic acids and have a pH of between 4.2 and 4.9. As tomatoes mature, the acidity level declines. Very ripe tomatoes of some varieties have pH levels above 4.6. For that reason, the FDA and the USDA both recommend adding acid to tomatoes or tomato juice in the form of lemon juice or citric acid. We test the pH of our tomatoes and tomato juice using a pH meter. The juice that we canned this summer tested at pH 4.0 without any lemon juice or citric acid added. Even so, whenever we open a jar of tomatoes or tomato juice, we always boil it for at least 10 minutes before tasting it. If you do not have a pH meter, be sure to follow the USDA recommendations regarding the addition of lemon juice or citric acid.
We can most of our tomatoes as juice since we use most of it for making soup. Betty starts the process by washing the tomatoes and cutting out any bad spots. Then, she cuts the larger ones into quarters. I take them out to the deck and run them through our old Squeezo juicer. I don’t know if the Squeezo is still sold, but ours has a long enough shaft where the handle attaches that I can chuck it into my half inch drill and avoid cranking it. With the Squeezo, the juice comes out through the screen and the pulp comes out the end of the screw. I run the pulp back through a second time to make sure we get all of the good stuff leaving only the seeds, peelings, and stems for the compost pile. We have a built-in wooden table on our deck. It was constructed with canning in mind, so it is perfect for this operation and the juicing takes very little time or effort. We also installed a water spigot on the deck, so we can hose everything down after juicing the tomatoes.
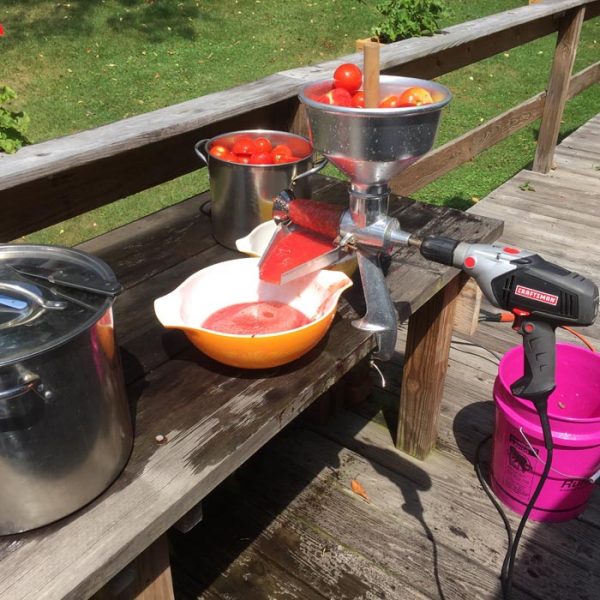
Juicing Tomatoes using an electric drill to crank the Squeezo juicer!
We bring the stainless pot containing the juice into the kitchen and set it on a burner on medium heat. Using a wooden stirrer, we stir the juice frequently as it heats to keep it from sticking and burning. When it begins to boil, we skim the scum from the top and then pour it into clean hot quart jars leaving one fourth inch of head space. Then we process it in hot water for the time prescribed by the USDA and the Ball Blue Book. If you are not able to verify the pH of your tomato juice, then remember to add the lemon juice or citric acid as directed by the USDA guidelines.
Canning whole tomatoes requires a little more work, but it is still easy and fun. Start out by cutting out any bad spots and washing the tomatoes. While washing the tomatoes, bring a large pot of water up to a boil and fill a sink with cold water. Drop the tomatoes into the boiling water for a couple of minutes and then cool them in the sink full of cold water. If they are scalded correctly, the skin slips off easily without damaging the tomatoes. If the skin does not come off easily, scald them a little longer. If you scald them too long, you will cook the tomatoes slightly making the outsides mushy causing you to lose some of the tomato when you remove the peels. We use an old baby spoon to scoop out the stem cores and then add the tomatoes to another large stainless pot to heat them to boiling. The remainder of the procedure for canning the tomatoes is the same as for the juice.
Betty’s garden has produced a bumper crop of cucumbers. Someone gave us a grocery bag full of dill which was enough to make one canner full (Seven quarts) of dill pickles. The recipe we use is very simple. We start out by putting a healthy amount of dill and a small clove of garlic in the bottom of seven empty quart canning jars. Then, we fill the jars with cucumber slices and add the pickling brine. We follow the brine recipe in the old Ball Blue Book.
As we mentioned earlier, Betty and I both grew up on small farms where home canning and freezing was a normal part of life. If you are just beginning to do home food preservation, start by visiting this web site where you can download the “USDA Complete Guide to Home Canning.” I also recommend this web site on home canning from the CDC. The National Center for Home Food Preservation web site provides another great resource for home canning and freezing. The current version of the Ball Blue Book recipes can be accessed at this link. Also, be sure to check out the free Purdue University basics of home canning on this page.
Remember to add your comments and gardening tips to make this a community effort!