

Betty’s Garden Diary – June, 2016
Since June and July usually bring lots of dry weather, most of this issue of Betty’s Garden Diary will be devoted to water management and most of that discussion will be about reducing water loss and about irrigation options for the garden. We already discussed this somewhat in previous issues when we talked about selecting a location for the garden and about leaving the soil a little rough when it is tilled to reduce the speed of the runoff water. Another option for managing rainwater is the use of mulch.
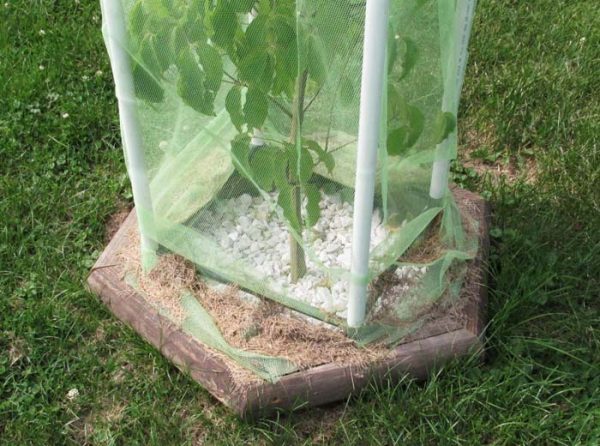
In addition to helping with the management of rainwater, mulches are used for weed control and beautification. In landscaping applications, mulches often perform all three functions. Last month, we assisted the West Liberty Lions club with planting a flowering dogwood tree in front of the West Liberty Elementary School. After we planted the tree, we placed a hexagonal frame around it made from landscape timbers. With the help of the children, we lined the interior of the frame around the tree with landscape fabric. Then, the children helped to spread marble chips on top of the landscape fabric. We also placed a frame made from PVC pipe around the tree to hold a mesh screen to protect it from the cicadas.
This was a typical use of landscape fabric and stones or stone chips as mulch. Landscape fabric is made from either woven or felt-like material, so it is porous thereby allowing rain and irrigation water to pass through. However, the weave or felt is dense enough to block the growth of weeds. Landscape fabric is usually covered with another material such as stones, wood chips or pine bark. For the tree at the school, the landscape fabric and marble chip mulch functions as weed control and to improve the appearance of the planting.
We use mulch in Betty’s vegetable garden for water management and to improve the soil. The remainder of this discussion is about the options for mulches to use in the garden for those purposes. We will consider man-made mulching materials and organic mulching materials. Each has advantages and disadvantages. For example, that landscape fabric seems to be perfect for the vegetable garden. However, it needs to be secured to keep the wind from blowing it away. It also needs to be picked up at the end of the season which turns out to be more difficult than expected because it tends to deteriorate somewhat during the summer, so one ends up picking up lots of shreds and it is a mess. In addition, the leaves and other plant residues from the garden collect on top of it along with some soil. By the end of summer, there are some weeds growing on top of it and rooting through it. We have also tried using old carpeting as garden mulch, but we had the same problems with it as with the landscape fabric. By the end of the summer, it had fallen apart and it was a mess to clean up.
One man-made material that is used in vegetable gardens is black plastic. Black plastic is available in three foot wide rolls which are used in commercial vegetable growing applications. Black plastic needs to be secured to keep the wind from blowing it away. Commercial users of black plastic mulch use machinery to install the plastic. Since the plastic prevents water absorption, the applicators also install drip irrigation hosing under the plastic. To hold the plastic down, the application machine presses the edges of the plastic down and covers them with soil. Click this link if you would like to watch a video of a commercial black plastic mulch applicator at work. Note the spool of drip irrigation tape on the front center of the machine. We have used black plastic mulch under our tomatoes and peppers in past years. It completely blocked the weeds and also warmed the soil so we were able to set the tomatoes and peppers out a little earlier. However, there were a couple of disadvantages. Since it is was not porous, it blocked the rainwater from reaching the soil, so we had to water our plants often even when we had plenty of rain. Plant materials collected on top of the plastic and rotted. By the end of the season, it was a mess. We used rocks to hold down the edges of the plastic. At the end of the growing season, we had to completely remove the plants and plant materials from atop the plastic. That meant pulling the tomato and pepper plants up and then raking off everything that was under them. Then, we had to pick up the rocks holding down the plastic and find a place to store them until the next summer. The black plastic was a single use material. By the time we removed it, it was too badly damaged to use again. We would not have wanted to do so anyway because of concerns about carrying over any plant diseases to the next year. Even with the problems, we used black plastic for a couple of years.
In addition to the man-made mulching materials like landscape fabric and black plastic, every department store garden center offers a selection of organic mulching materials. Those include different varieties of wood and bark chips. If you have a home workshop, you may also have sawdust available. You may also have some old newspapers. In the March issue of the Garden Diary, we discussed composting. During that discussion, we talked about the “Carbon-Nitrogen Ratio.” As you may recall, materials with a C-N Ratio above 30-1 take a long time to break down and require additional nitrogen to do so. Wood and bark chips and sawdust have a C-N Ratio of 350 – 1 to 400 – 1. The C-N ratio of newspapers is around 200-1. Those materials actually compete with your garden plants for available nitrogen. In addition, wood and bark chips and sawdust take a couple of years to break down. That longevity makes wood and bark chips great for landscaping applications but they are not a good option for the vegetable garden. We tried using newspapers under our tomato plants one year. We didn’t use enough papers and the weeds eventually came through them. When they were intact, we had to water the plants because very little rainwater soaked through the newspapers.
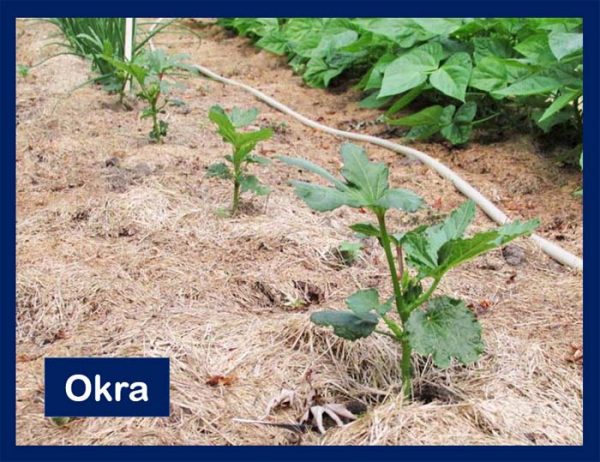
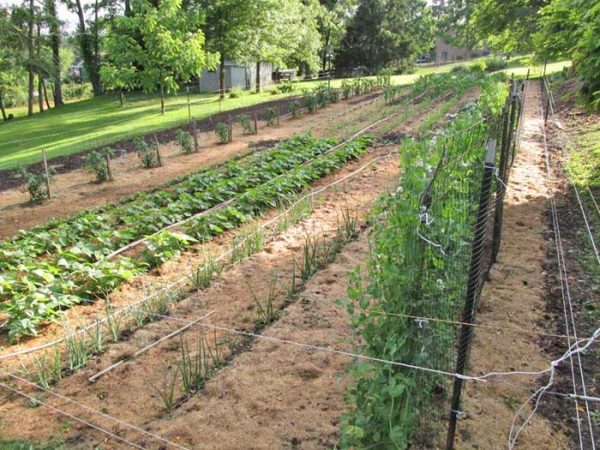
Several years ago, we had some friends who had a great garden. They mulched everything heavily with grass clippings from their lawn. We tried doing the same thing and the results were excellent. Grass clippings have a C-N Ratio of 20-1. They actually contribute a small amount of nitrogen to the soil as they break down over the summer. Betty’s garden has a slope of 7% or seven feet of drop in one hundred feet of distance. The grass clippings absorb the water and help it to soak into the soil. Starting with the tomatoes, peppers, and cabbages, we mulch everything with two to three inches of grass clippings. Three inches of fresh clippings quickly breaks down into about a one inch layer of mulch. We replenish the clippings if bare soil spots appear. Thanks to the generosity of some great neighbors, we are able to collect grass clippings from a couple of lawns besides our own, so we have plenty of free clippings and our neighbors appreciate having their grass cut! However, if you are going to collect clippings from your neighbor’s lawn, you need to make sure that the lawn is not chemically treated for weeds or insects. A batch of clippings from a lawn treated with herbicide will quickly wipe out your garden.
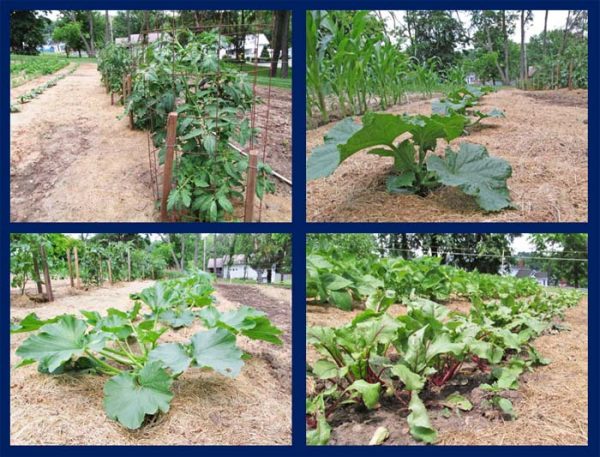
Top row: Tomatoes and Bush Cucumbers
Bottom row: Zucchini and Beets all mulched with grass clippings
The grass clipping mulch also greatly reduces water loss due to surface evaporation. For that reason, we try to avoid walking on the mulch unless the weather has been very dry. The only downside to the grass clipping mulch is that it will rot if the weather turns very wet and stays wet. However, we have only had that happen once during the twenty years that we have been mulching with grass clippings. At the end of the growing season, we rototill the grass clippings into the soil and they break down very quickly. As a result, the soil in Betty’s garden has a high organic matter content.
The grass clipping mulch helps us to grab and hold much of the rainwater when God waters our garden, but sometimes we also need to water the garden. Up the hill and across the street from our house, there is a barrel which collects water from Court Spring in West Liberty. Court Spring comprises one of the headwater sources for the north fork of Short Creek. The town of West Liberty was built here because of that spring which flows all year. We placed a screened intake into the water barrel and then ran a hose to our garden. The amount of drop in elevation from the water level in the barrel to the lowest part of our garden is about 33.5 feet. Every foot of drop provides .4333 PSI of water pressure. .4333 x 33.5 = 14+ PSI at the garden. However, the length of the hose diminishes the pressure slightly. Using a five-gallon bucket and a cell phone timer, we determined that we have a flow of just over two gallons per minute at the lowest part of the garden. That number may not seem impressive, but the spring pours way more water into the barrel than we can take out, so the flow is constant. We use a drip irrigation system to water our plants. As mentioned earlier, our garden has a 7% slope, but the rows run somewhat crossways to the slope so there is only a drop in elevation from one end of a row to the other of about three feet. That three foot difference in elevation creates a difference in water pressure from the low end of the row to the high end of the row. In addition, the water loss from the drip emitters on the lower end of the 100 foot long row also lowers the pressure a little. However, the emitters are adjustable from completely off to full flow, so we are able to balance them out to water the entire row. Our 20 tomato plants are five feet apart. We put a drip emitter at each tomato plant. Although the emitters were designed to be used with the ¼ inch drip tubing, we bought two cheap fifty foot sections of garden hose and put the emitters directly into the hose. When we water the tomatoes, we lay the hose across the tops of the cages. When we water a row, we lay the hose on the uphill side of the row. Since the emitters are five feet apart, we water the row for a couple of hours and then move the hose endways to get the spaces between the emitters and run it for a couple more hours. We can deep water the entire garden in a few days.
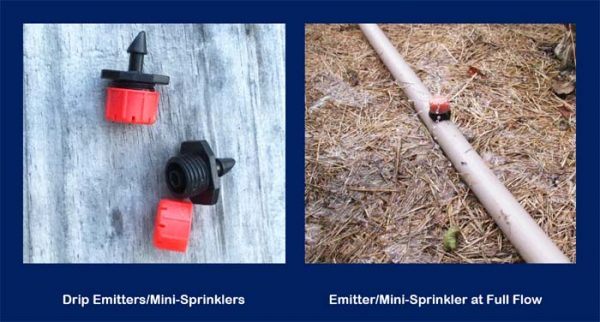
These fully adjustable drip emitters were purchased online through Amazon. They cost $9.20 + shipping for 100. Here is the link. When the emitters are set to full flow, they function like mini sprinkler heads. However, we usually adjust them so that they are just running at a rapid drip so that we have enough water to take care of a full 100 foot row.
We have also tried other irrigation devices. The gravity feed system does not provide enough pressure to run a sprinkler hose or soaker hose very well. It will also not water a very large area using an oscillating sprinkler head and won’t even run some of them. The little three arm spinning sprinklers water a three foot circle on the gravity system. Those are all options for a high pressure system, but it looks like the best option for a gravity flow system is to use the low pressure drip emitters.
If you don’t have a natural water source such as a stream or spring, a water catchment system that collects the rainwater from the roof of your house or some other structure provides another option for a gravity flow system. Back in the day, most farm houses had cisterns or rain barrels. The cistern was usually below ground and required a pump to provide the water pressure. An elevated rain barrel or an array of elevated rain barrels can be used to create a gravity flow system. The internet is full of descriptions of homemade water catchment systems. This is a link to a YouTube video showing one homemade system. This is a link to another homemade rainwater collection system video. If you live in a city or other incorporated municipality, you need to be sure that there are no ordinances prohibiting the collection and storage of rainwater before you set up a rainwater catchment system. The system needs to be enclosed to prevent dirt and debris from getting into the water and to keep mosquitoes out. Some type of filter on the outflow is necessary to keep from clogging the irrigation system. You will also need to provide drainage for the overflow when your storage containers are full. If your rainwater catchment system is going to cost very much to install and maintain, it may actually be cheaper to water your garden with city water.
One important thing to remember if you are creating an irrigation system that draws from a public water system is to make sure that there is no possibility of a backflow into the public water system in the event of a pressure drop in that system. The way to do so is to install a backflow prevention device which should be available at any plumbing supply store. Backflow preventers are one-way valves that allow the water to flow freely in one direction, but close if the flow direction is reversed.
Here is a link to a great PDF document showing how to set up a drip irrigation system. It is published by the Cooperative Extension Service of Utah State University.
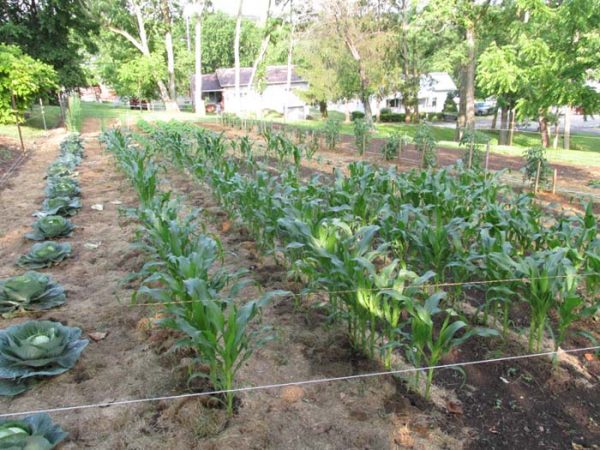
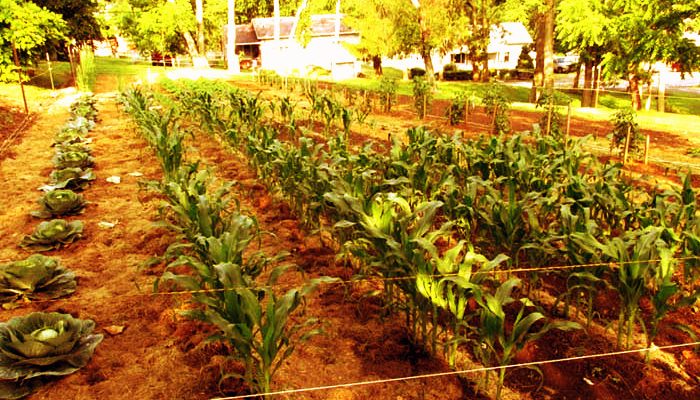
In spite of the three weeks of dry weather in late May, Betty’s garden is progressing. The picture above was taken on June 17, 2016. When we planted our sweetcorn, we planted a patch of Early Sunglow and a patch of Ambrosia. A couple of weeks later, we had a good stand of the Early Sunglow and a very poor stand of Ambrosia. We replanted the Ambrosia and planted another patch of Ambrosia for later corn. But, almost none of it came up. We dug up some of the seeds and discovered that they had not germinated. Thus, we concluded that the Ambrosia seed was bad. Although Ambrosia is our favorite full season variety, we replanted with a variety called Candy Corn which germinated well and now comprises our third planting of sweetcorn. Since we had a little unused space, we planted a fourth plot of corn which was just emerging by mid-June. Back in April, I got carried away and planted all 30 of the cabbage plants that we had in the cold frame. Some of those had heads that were large enough to harvest by mid-June and a couple of them were beginning to split. Since the weather forecast called for rain, we decided to harvest the larger heads and make our first batch of sauerkraut because we knew that the rapid growth spurt after the rain would cause more of them to split. We used nine or ten of the heads to make 30 pounds of sauerkraut. We will publish our kraut recipe in the July Garden Diary. The rain made the sugar snap peas shoot up and they are in bloom. We have tied them to the pea fence twice, but they need to be tied again. One night, I forgot to plug in the electric fence and some deer grazed off the tops of some of the sugar snap peas which set them back a little. There are green tomatoes on our early tomato varieties and some of the other plants have blooms. If you want to try it, there is a product called “Blossom Set” that will trick some of those early blooms into forming fruits, but we are just going to wait and let nature run its course. The zucchini plants and the bush cucumber plants look good although they haven’t bloomed yet. Betty found some cantaloupe plants in our compost pile and transplanted them into the garden. They are growing, but I am skeptical about them.

Sweet Potato Plant
We set out our sweet potato plants earlier this month. Betty started those by putting a couple of sweet potatoes into containers of water. As soon as the sprouts got a couple of leaves, she twisted them off and stuck them into a bowl of wet sand to root. Although they are still small, they are doing well.

We were thinking of adding some flower boxes to our deck railing, so our daughter gave Betty six Geranium plants for Mother’s Day. We made the planter boxes using six inch wide treated deck boards. They are not fancy, but they look nice. Each planter box used around 45 inches of the deck board, so an eight foot deck board produced two boxes. Since we were putting a single plant in each box, we only made the interiors of the boxes nine inches wide, but the three boards that make up the front, back, and bottom of the box could be cut longer to make wider planter boxes. If you want to make similar planter boxes, you may access the plans on my web site by clicking here!
As I mentioned in previous issues, our garden is not a showcase. There are lots of great gardeners around here. If you are a gardener, please share your comments and ideas so that this series can become a community effort.