

Betty’s Garden Diary – May, 2016
Several folks have asked why this series is called “Betty’s Garden Diary” if Earl writes it! The reason is that Betty does most of the work in the garden! Our garden is a team effort, but Betty does more of the planting, hoeing, weeding, etc. We work together when it comes to picking and preserving what the garden produces. In this installment of Betty’s Garden Diary, we will discuss planting beans, Zucchini, beets, and cucumbers and will describe our procedure for setting tomato and pepper plants. We will also discuss how to take care of your daffodils and bearded irises and when to prune some of your ornamental trees and shrubs.
When we were children, family dinners at “Grandma Nick’s” (Nicodemus) at this time of year were great because they always included Aunt Ruth’s Rhubarb Crunch. Aunt Ruth was my father’s oldest sister and she could work magic with that rhubarb. This is a gardening series, so I have posted Aunt Ruth’s Rhubarb Crunch recipe for you on my own web site. Click here if you want the recipe! I mentioned the rhubarb crunch because Betty is making Rhubarb Crunch using Aunt Ruth’s Recipe out of the Nicodemus Family Cookbook right now as I am typing this!
Rhubarb is easy and fun to grow, but here are a few useful tips that will help you if you are going to plant it for the first time. Rhubarb is grown from crowns which are usually planted in the early spring while they are still dormant. The crown is essentially a large underground bud with roots which is obtained by dividing older rhubarb plants. When you plant the crowns, make a good sized hole and fill it with loose topsoil mixed with compost or potting soil. Cover the top of the crown with a couple of inches of the loose soil and water the plants well. Do not pack the soil down. If you can find the crowns, it is still not too late to plant them for this spring. Otherwise, you can also plant them in the fall after the plants have gone dormant. Rhubarb does not like to be transplanted, so choose the location carefully. Space your plants about three feet apart. Rhubarb does best in topsoil with a high organic matter content. Since most of the plant consists of leaves, it responds well to nitrogen rich fertilizer. It also likes a very slightly acid soil with a pH of 6 to 6.8. Rhubarb also does best in places where it receives full sunlight. Our part of the country is perfect for growing rhubarb because it requires a winter soil temperature below 40 degrees in order for the crowns to break dormancy.
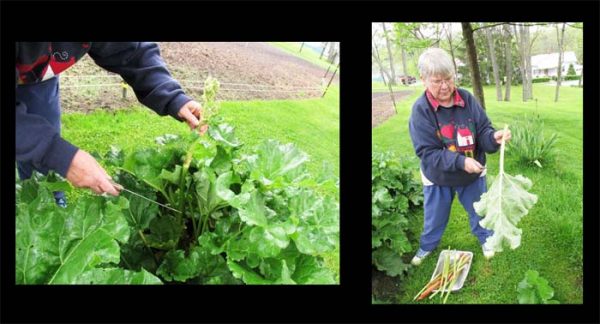
Left – Removing a Flower Stalk Right – Removing the Inedible Leaf Blade
Rhubarb is a true perennial, so it will come back up every year. It will also shoot up flower stalks every year. You will want to cut those off as soon as they appear so that all of the energy of the plant goes into the leaves. The leaf petiole or stalk is the only part of the plant that is eaten. When you harvest the rhubarb, cut the leaf off close to the plant and then cut off the broad part of the leaf above the petiole (stalk) and add it to the compost pile. Do not eat the leafy part. It contains a poison called oxalic acid which will give you a really bad belly ache and can make you seriously ill. Rhubarb is easy to freeze. Just clean the stalks and drain all of the water off of them. Then, cut them into ¾ inch long pieces, spread them out on a cookie sheet and place them into the freezer. After they are frozen, place them into a zipper bag or a freezer container and return them to the freezer. Rhubarb is harvested in the spring when it is rapidly growing. As the weather becomes hotter and drier during the summer, the growth rate slows and the stalks become stringy and tough.
Because of the unseasonably cold weather, the soil was colder than normal during late April and early May. The cold soil has impacted our sweetcorn. The Early Sunglow corn is up and doing well, but our first planting of Ambrosia has only partially germinated. When the soil stays cold and damp, we have to worry about fungi damaging the seeds if they do not germinate quickly. The pink coating on the corn and pea seeds is a seed treatment consisting primarily of a fungicide to protect the seeds in the cold damp soil. Most of the corn and pea seeds available locally are treated, so it is a good idea to wash your hands after handling the seeds. Do not leave treated seeds where chickens or other animals could eat them. Another problem with the germination of the Ambrosia is that the soil crusted over after a week of rain. That crust can block the plants from emerging. If that happens in your garden, use a hoe to break up the soil over the row being careful not to hoe out any emerging plants. We have replanted the empty spaces in the Ambrosia plot and have planted the second Ambrosia plot.
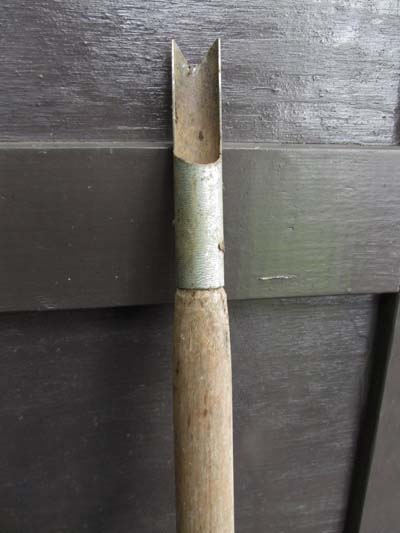
Normally, we would set out our tomato plants around the first week in May even though the average last frost date for this area is mid-May. After we set the tomato plants, we put up the tomato cages which will support them. We made the tomato cages using concrete reinforcing wire about thirty years ago. It was a costly investment at the time, but a roll of the reinforcing wire provided cages for our tomatoes and peppers and a forty foot fence for our sugar snap peas. Since it has lasted so long, it was a good investment! Originally, the cages had prongs created by cutting off the bottom line wire. However, many of those have rusted off, so we support each cage with two stakes set 90 degrees apart against the sides of the cage. The easiest way to put up the tomato cages is to set the two stakes after planting the tomatoes and before setting the cage. I made a driver for tomato stakes by welding an old sledge hammer head that we found in the garden onto a two-foot long section of two inch steel pipe. The pipe fits around the stake and we just slide it up and down to drive the stake. It is similar in design to a steel post driver, but smaller.
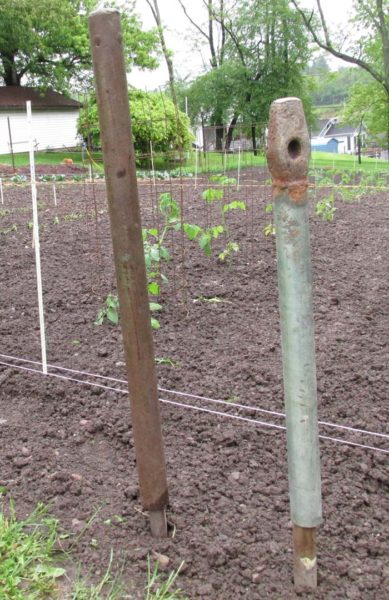
Steel post driver on the left – Tomato stake driver on the right
We started our tomato plants around the first of April in newspaper pots. After they were a couple of inches tall, we transferred them into the cold frame which is located on the south end of our house. We set our tomato plants about five feet apart. Even though the roots would eventually grow through the newspaper pots, we remove those before we set the plants. We mulch around each tomato plant with a thick layer of grass clippings. In case of frost, we pull the large sized heavy duty contractor garbage bags over the cages to enclose the plants being careful not to rip the bags on the wire. Since those bags are reusable, they last for several years. Since the rainy weather has continued until well after the middle of May, we finally decided to work the garden while it was a little wet just so that we could get our tomato and pepper plants set out. After a soaking rainfall, the garden needs four or five days of dry sunny weather to dry enough to work. Unfortunately, we have not had that many sunny days in a row in West Liberty since March. We will see how the decision to work the wet soil impacts our results.
In the April issue of the Garden Diary, we mentioned that the old timers called May 15 “Vine Day” indicating that it was safe to plant vine crops after that date because the probability of frost was low. Mid May is a great time to plant things like beans, beets, cucumbers, and squash. This year, we are planting bush cucumbers just to see how well they do. We are also planting Blue Lake Bush Beans for canning. Green beans are easy and fun to grow. You can plant bush beans or pole beans, but we prefer the flavor and texture of the bush beans, so that’s what we usually plant even though there is less stooping when it is time to pick the pole beans. Plant your beans about two inches apart and cover them with an inch of loose topsoil. Beans and peas are legumes. When you plant beans and peas, you have the option of treating the seeds with an inoculant which coats them with nitrogen fixing bacteria which form nitrogen fixing nodules on the roots of the plants. We do not inoculate our seeds because our garden is very high in organic matter which provides adequate nitrogen and because the plants get some nitrogen from the grass clipping mulch which we put along the rows as soon as the plants are big enough. Do not put artificial nitrogen fertilizer on your beans or peas. If you do, you will likely have huge lush looking plants, but no beans or peas!
We decided to grow some okra this year even though it is an unusual crop in this area. The okra seeds were started in our germination chamber and then transferred into the cold frame. On May 6, we transplanted nine of the okra plants into the garden. Okra plants get very large, so we set them a couple of feet apart. Okra plants are easily damaged by frost, but our plants are only about five inches tall, so we used old plastic coffee cans to cover them when we had a late frost in the middle of May. Several years ago, we had three okra plants and they grew to be five feet tall! We gave okra to everyone who would take some and still had okra that went to waste! Okra is used for thickening in gumbo and it is easy to freeze. You can freeze the pods whole or cut them into half inch long sections. Just spread them out on a cookie sheet and put them into the freezer. After they freeze dump them into a freezer box or zipper bag. When you want to make gumbo, just grab a handful and toss it into the soup pot.
We always seem to have a problem growing beets. Either we plant them too thick and have to thin them or we plant them too thin and only half germinate! This year, we covered the seeds with about half an inch of topsoil that we sifted through a ¼ inch mesh screen so that we had a consistent, half inch deep soil cover over the seeds. Beet seeds are often clustered together in the packet. You can use a rolling pin to gently break them apart or just plant them and thin the extras after they come up. We are always concerned about damaging the seeds, so we just plant the clusters and then thin the beets after they come up. The sifted soil worked great. Thanks to a nice rain shower the night after we planted them, they came up thick this year. Beet tops are great on a salad. Remember that the mature beets will be three inches or so in diameter, so you eventually need to thin the beets so that they are about four inches apart in the rows. Another great way to thin them is to harvest every other one when they are about an inch and a half in diameter. Then steam them and add a little butter. Beets love cool weather, but they will grow all summer and into the fall. We have a great old fashioned pickled beet recipe which I will share if our beet crop is a success. Birds have already eaten off some of our pepper plants this spring. Robins will also pull up the tiny beet plants. Since some of our pepper plants were damaged by the robins, we made cages out of 18” by 12” sections of half inch hardware screen and put them over the plants to protect them until they get large enough to no longer be at risk. To protect the beets, we have made wickets using scrap half inch CPVC pipe which will support a strip of half inch plastic screen.
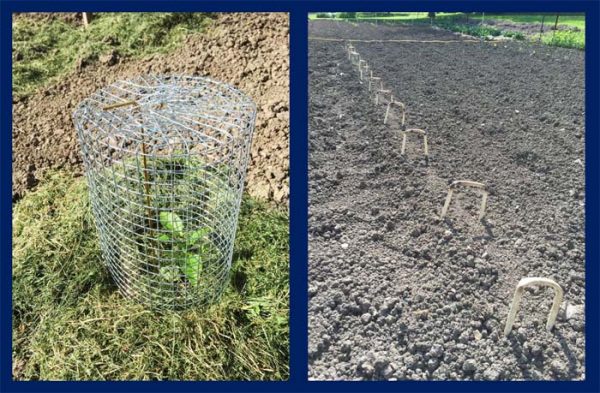
The picture on the left below shows one of our mini cages over a pepper plant and the picture on the right shows the wickets on the beet row before we covered it with the plastic mesh.
We like to plant our zucchini in clusters of three seeds with a spacing of about four feet between the hills. Zucchini are fun to grow because they produce so many fruits. Last summer, we gave zucchinis to everyone who would take some! We mulch the zucchini heavily with grass clippings as soon as they come up and then try to maintain a thick layer of clippings around them to manage water and to keep the fruits off of the ground. Our other vine crop this year is cucumbers although we are growing bush cucumbers instead of vining cucumbers. Since we have never grown the bush variety before, it will be an interesting experiment. We planted a fifty foot row of the bush cucumbers with a spacing of about six inches between the seeds. Betty covered the cucumber seeds with ½ inch to 1 inch of sifted soil.
Some things are also going on outside the vegetable garden. Our forsythia was very nice this year, but it has gone wild since it bloomed over a month ago. This is a good time to prune the forsythia. Forsythia flower buds form on the plant during the summer prior to the year that it blooms. So, the best time to prune forsythia is shortly after it blooms. If you prune it during the fall or winter, you will cut off the stalks containing the flower buds, so it won’t bloom the following spring. Don’t be afraid to prune forsythia very aggressively. During this time of year and throughout the summer, it grows very rapidly. We like to have our forsythia with a natural, bushy look. However, you can also prune forsythia into the form of a hedge. Just remember not to prune it very late in the fall. We also pruned a couple of pine trees that are on our lot. We planted those using tiny seedlings that were given to our children on Arbor Day about 35 years ago. The pruning consisted of removing the bottom few rows of branches so that we could mow under them. Most fruit trees are pruned during the winter when they are dormant. However, you can prune your trees at this time of year if they need it without causing any harm to the trees. They may ooze some sap, but the pruning scars should heal over nicely. If you are removing a large branch, start by cutting up from under the branch close to the tree. The undercut needs to only be half an inch or so into the wood. If you go deeper, the weight of the branch might pinch and trap your saw blade. The purpose of the undercut is to keep the branch from peeling off a strip of bark when you cut it off. Click Here for a great resource from Purdue University on pruning ornamental trees and shrubs.
Our daffodils were spectacular this spring. They hit their prime right at Easter time. Now, we are left with a bunch of daffodil plants and no blooms. Sometimes, people make the mistake of mowing down daffodil plants after they bloom. However, they need to grow all summer to make new bulbs so that they will bloom next year. Every year, the cluster of daffodils that started out as a single bulb grows by adding more bulbs. Eventually, those need to be dug up and divided. However, the time for doing that is in the fall. Just let them grow for now!

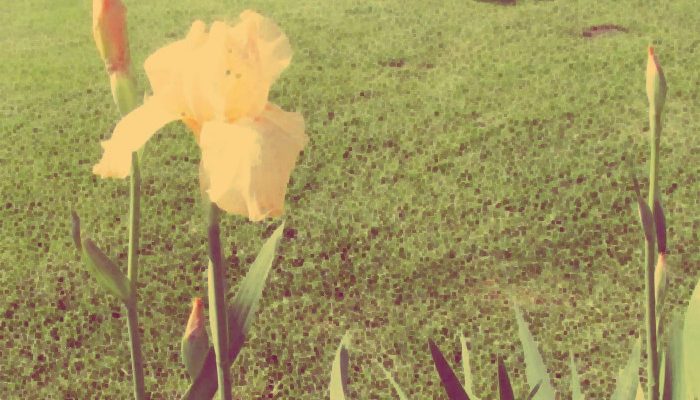
Hybrid Bearded Iris
Between the rows of daffodils along WV Route 88 in front of our house, we have a row of hybrid bearded irises. Those are in bloom now although the number of blooms this year is below average. The buds were harmed by a late freeze about a month ago. Bearded irises grow from rhizomes which are enlarged underground stems. After they bloom, remove the flower stalks to prevent the development of seeds so that all of the energy goes into the rhizomes. The iris plants will continue to grow throughout the spring and early summer. When the weather turns hot and dry in July, August, and September, the iris plants go dormant. That is the time to dig up old clusters of iris rhizomes, divide them and transplant them.
The worst enemy of bearded irises is the iris borer. Iris borers are the larvae of a moth which lays its eggs on the old dead iris leaves during the late summer which means August and September in our region. The moths are quite large with a wingspan of around two inches. The eggs overwinter on the dead leaves and then hatch the following spring. The larvae make their way onto the green leaves of the iris plants and burrow to the interior. All summer, they eat their way down until they enter the rhizome. By that time, the larvae are over 1.5 inches long. The damage causes the rhizomes to rot. The key to controlling the iris borers is to clean up all of the old dead leaves from the iris bed in the fall. Removing the dead leaves, removes the borer eggs. There are also systemic insecticides available for killing the iris borers that are inside the plants. Those insecticides are put into the soil where the iris roots absorb them and carry them into the leaves where they are consumed by the borers. We have opted not to use the insecticides because our grandchildren and other neighborhood kids love to pick the daffodils that are in the same beds with the irises. As a result, we have lost a few of our irises due to borer damage over the years.
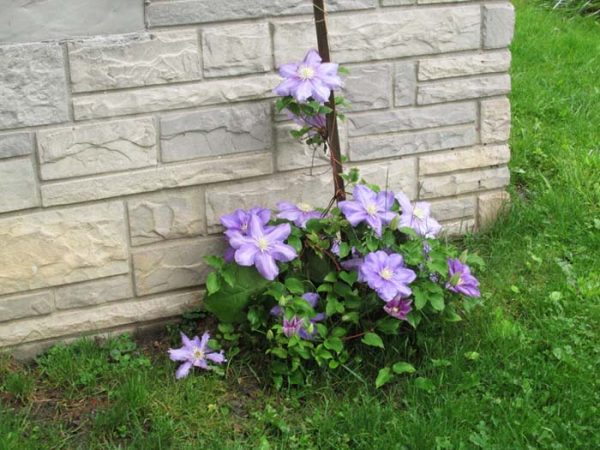
We planted the clematis in the picture at the beginning of this document a couple of years ago. Based on the amount of growth during the last summer, it looks like building a trellis is on the to-do list for this summer. A healthy clematis vine can grow to be over ten feet tall. Clematis vines love full sun although this one is in the sun for only half a day since the house shades it for the other half day. I think we will look for some cedar to build the trellis since cedar lasts for a long time outdoors
Homemade Dandelion Weeder
Last month, we mentioned our homemade dandelion and thistle removal tool but neglected to include a picture, so here it is! It was made using a short section of ¾ inch electrical conduit and a rake handle. The nice thing about our homemade tool is that there is no stooping over to use it because of the long handle. Last month, we also promised to publish some information about irrigation options in the May Garden Diary. However, we decided to postpone that since it has rained every week since then.
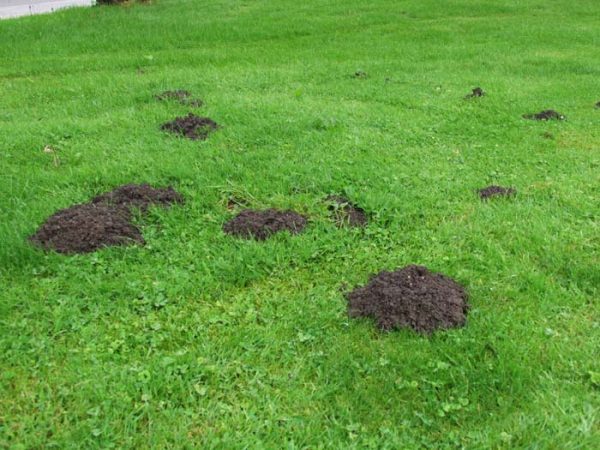
Mole Hills in Nicodemus Lawn!
We have a ground mole problem in our yard. Our mole population has exploded during the last few years. Ground moles normally dine on earthworms and grubs in the soil. Therefore, a population of moles actually indicates a healthy population of earthworms which suggests that the lawn is also healthy. However, I think that the population explosion during the last two or three years is also likely related to the tens of thousands of cicada nymphs in the soil which have created a bountiful food source for the moles. Those will be gone when the cicadas emerge, so the mole population will likely decline with the loss of the food source. The shallow mole tunnels or runs that we see pushing up the sod are feeding tunnels or tunnels that are used to reach feeding tunnels. When a large molehill develops, it is an indication that the mole is excavating a deep tunnel which is for nesting. Each of those huge molehills suggests the presence of a pregnant female. Our local stores and the Internet both provide lots of options for getting rid of moles. In addition, some people swear by old home remedies like putting chewing gum into the mole runs. The story is that the mole will eat the gum and die because it is unable to either regurgitate or pass the gum. Since researchers were unable to get moles to consume the gum, the jury is still out on that remedy. However, some of my friends have told me that they were able to get rid of moles with bubblegum! Another home remedy is to try to flood the mole tunnels with water. This one conjures up images of Bill Murray in the movie, Caddyshack! After some of the recent soaking rainstorms, we had standing water on parts of our lawn. A few days later, the moles were back at work in those areas. If flooding the area didn’t drown the moles, shoving a garden hose down the hole is not going to do so either. More traditional options include poisons and traps. Most of the experts indicate that trapping the moles is the best way to get rid of them. There are a couple of different types of traps available at local stores for killing moles. Some of the expert writers also suggested a method for catching the moles alive so that they could be relocated unharmed. They cut a section of sod out of the middle of a feeding tunnel and then buried a coffee can or other container in the middle of the tunnel pathway so that the opening at the top of the container was level with the bottom of the mole tunnel. Then, a cover was put over the tunnel. The moles fall into the containers, but are unable to climb out. I am going to experiment with a couple of trapping methods and with the chewing gum idea and will let you know how well they work in future Garden Diary issues. By the way, the best thing to do with a molehill is rake up the soil to uncover the grass and then add the soil to your compost pile. Here is a good page about moles from the University of Missouri.
Remember to make comments. Please share your gardening ideas. Betty and I are not experts. We are just sharing what we do in our garden. We would love to hear great gardening ideas from other folks.