Betty’s Garden Diary February, 2016
Simple Soil Science for Gardeners
Betty’s Garden Diary thanks Dr. Michael Nicodemus for his contributions to this edition. Dr. Nicodemus has a PhD in Forestry from Purdue University. His PhD research had to do with the manner in which plant roots absorb available nitrogen from the soil, so soil science is one of his areas of expertise. Dr. Nicodemus is currently a Biology Professor at Harding University in Arkansas.
Betty’s garden is located in West Liberty not far from the West Liberty Firehouse. Court Springs emerges from a stone wall just up the hill and across the street from our lot. It also emerges at the lower part of our lot. During the 39 years that we have lived in West Liberty there have been several projects that required us to dig. The top six to twelve inches of Betty’s garden consists of topsoil. It is quite loose and is dark in color. The subsoil layer just under the topsoil is more dense and contains a higher percentage of clay along with a few rocks that always seem to be located anywhere that we need to dig. Although that subsoil is more dense than the topsoil, it is clear that some water is moving through it. The subsoil layer here is four to five feet deep. Under that layer, there is a strange layer of coarse flat, slightly rounded stones. The stone layer is only four to six inches thick and it is right on top of a very dense layer of hard clay. The hardpan layer under the layer of stones effectively blocks water from flowing through it thereby causing the stone layer to become the reservoir that provides the water for Court Springs which flows all year round. The layers of soil under Betty’s Garden are very similar to the soil layers in most of the gardens throughout this region except that the subsoil layer in many areas is deeper and is on top of a layer of bedrock and the stone layer that provides water for Court Springs is absent. If your garden is located in a creek bottom, it may also have more sandy soil than ours or may have a layer of gravel. Soil scientists refer to the layers of soil as “strata.” Although the exact nature of the soil strata in your back yard may be different from those in our back yard, all of our garden crops are grown in the topsoil which comprises only the top few inches of our gardens, so the entire rest of this discussion will be about the topsoil.
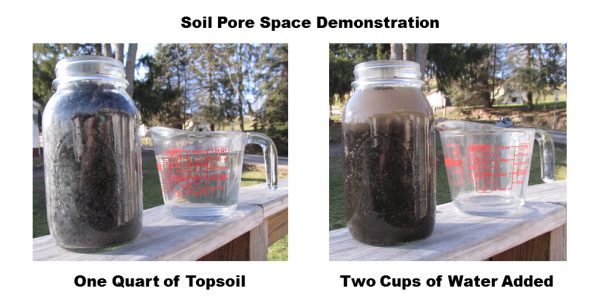
We all know that the topsoil is the dark colored top six to twelve inches of soil, but what is in it? Why is it dark in color? What is it made of? How does it provide nutrients to the plants? What can a gardener do to make it more fertile? We will start with the first question: What is topsoil made of? Actually the volume of your topsoil can be as much as half air and water depending on how much it has been compacted. The other half consists of a mixture of organic and inorganic materials. The pores in the soil that provide the spaces filled by air and water are important for your plants. They provide for internal drainage which keeps the plant roots from falling victim to fungi and microorganisms in the soil. Just for fun, we went out and collected a quart of soil from the end of our garden being careful not to compact the soil. Then, we poured water into the jar to see how much the soil would hold. The quart-sized sample held almost two cups or a pint of water. The dark color of the topsoil in our sample is caused by the high organic matter content.
The inorganic part of your topsoil includes everything from man-made junk to the chemical elements that your plants need to grow. In our garden it even includes rocks and broken glass! I even found a penny when we collected the soil for the pore space experiment. Excluding the man-made junk, the inorganic part of your soil consists of a collection of different sized mineral particles. The exact nature of those minerals was determined by the parent material that weathered down to form the soil. Soil scientists classify those inorganic soil particles by size as sand, silt, or clay. Sand particles are between from 2mm in diameter to .05 mm in diameter or from about half the diameter of a BB to the diameter of a human hair. Silt particles range in size from the diameter of a human hair to .002 mm in diameter. Larger silt particles can be seen with a microscope, but the smaller ones can only be seen with an electron microscope. Clay particles are smaller than .002 mm in diameter and can only be seen with an electron microscope. Some clay particles consist of only a couple of molecules of material. The soil in your garden consists of a mixture of sand, silt, and clay. Soils are classified according to the amounts of sand, silt, and clay that they contain. We think that the soil in Betty’s garden would classify as a “Clay Loam” or a “Silty Clay Loam” meaning that it has a good mixture of different sized soil particles thereby combining the drainage advantage of the sand and coarser silt with the nutrient holding capacity of the clay. The graph below shows how soils are classified according the amounts of sand, silt, and clay that they contain.
United States Department of Agriculture Soil Types Chart
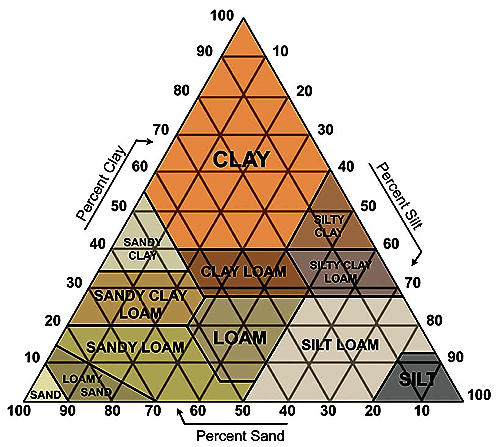
We think that the soil in Betty’s garden would classify as a clay loam or a silty clay loam.
Each soil type has advantages and disadvantages. Since sand grains are quite coarse, water easily drains through it, so it dries out quickly. However, sand grains do not hold and exchange plant nutrients very well. Because silt particles are smaller, silt does not drain as quickly as sand. It holds more water than sand and it also holds and exchanges slightly more soil nutrients than sand. Smaller silt particles hold and exchange plant nutrients better than larger ones. The champion among soil particles when it comes to holding and exchanging soil nutrients and water is clay. As one can see from the chart below, a gram of clay has over 1000 times the amount of surface area as a gram of coarse sand. More surface area means more ability to hold and exchange plant nutrients. However, the tiny clay particles are easily carried into the pore spaces in the soil by rainwater, so clay soils are not very well drained. Clay also tends to be sticky, so soils high in clay are also sometimes difficult to work.
United States Department of Agriculture Soil Particle Classifications By Size
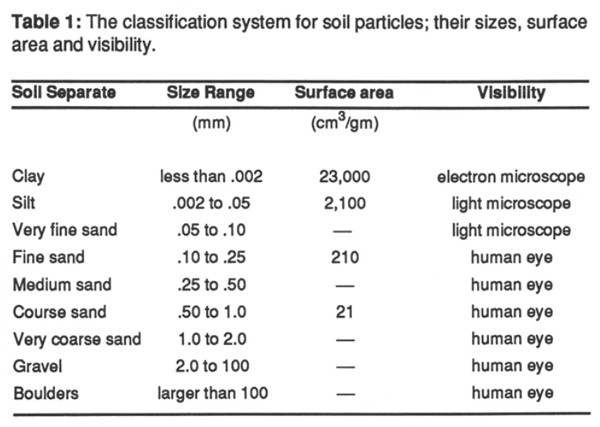
Note that a given volume of clay grain has 1000 times the surface area as the same volume of coarse sand.
The other major component of your topsoil is the organic matter. Organic matter refers to anything that is living or that has resulted from the decomposition of something that was once living. It includes earthworms, insect larvae, ground moles, trees, weeds, microorganisms, and any other living things. As organic matter decays, it can actually compete with your plants for soil nutrients, so it is a good idea to compost most raw organic matter before working it into your soil. A good load of animal manure is a great addition to your garden in the spring before you plow or rototill it as long as the manure does not contain a large amount of raw sawdust, wood chips or straw. If it does, then it should be composted before you work it into the soil. Adding organic matter to your garden is the best way to improve the fertility of the soil. As organic matter decomposes, it releases nutrients into the soil. Eventually the organic matter decomposes to a point where it cannot decompose any farther. When it reaches that point, it is known as humus. Soil scientists have not yet determined the exact composition of humus, but humus is extremely beneficial in your garden. Humus is very dark in color, so soils that are high in humus will have a dark appearance.
Most available plant nutrients exist in the soil as positively charged particles called “cations.” Soil scientists refer to the ability of soil to hold and exchange nutrients as the “Cation Exchange Capacity” or “CEC” The higher the CEC, the greater the ability of the soil to hold and exchange nutrients. Coarse sand has a CEC of almost zero. The CEC of clay is much higher, but the CEC of humus can be as much as 50 times that of clay, so soils that are high in humus are extremely fertile. In addition, humus holds water like a sponge in a form that is highly available to plants, so a soil high in humus does not dry out as quickly between rain showers. Humus is very stable. Soil scientists believe that it can remain in the soil for hundreds of years if it is not eroded away by runoff water. In addition to improving the fertility of the soil, humus helps to improve soil structure by helping sandy soils to hold water and nutrients better and clay soils to be more workable. By the way, you cannot go to the garden center and buy humus to add to your garden. If the bag says humus, it is misleading! However, you can increase the amount of humus in your soil by adding organic matter.
As we mentioned, the major nutrients that your plants need exist in the soil as ions. Those ions are attracted to the soil particles where they are held until they are absorbed by the plants. Some of the exchangeable ions in the soil that are important for your plants are calcium (Ca ), magnesium (Mg), potassium (K), sodium (Na), ammonium (NH4), Nitrate (NO3), and phosphate ( PO4). Every garden center and farm supply store sells bags of artificial fertilizer containing Nitrogen(N), Phosphorus (P), and Potassium(K). The bag shows the percentage of each of these plant nutrients in the fertilizer blend in the form of three numbers. For example, the bag may say 15-15-15 which means that the mix contains 15% N, 15% P and 15% K. Garden centers also sell agricultural lime which contains calcium.
Beginning gardeners often over fertilize their soil. Calcium, magnesium, potassium, and phosphorous all tend to cling very tightly to the soil. They build up in the soil year after year. If they are added in excess, the buildup can actually make other nutrients like nitrogen less available to your plants. The nitrogen from fertilizer, or from the breakdown of organic matter in the soil, becomes available to the plants in the form of ammonium (NH4) or nitrate (NO3). Both of these forms of nitrogen are water soluble and will leach from the soil. If the concentrations of calcium, magnesium, potassium, and phosphorous are too high, the nitrogen in the soil becomes less available to the plants, so over fertilizing with those nutrients can actually lower the productivity of the garden. A great form of slow-release nitrogen in the soil is decaying organic matter, but some types of organic matter will actually reduce the amount of available nitrogen in the soil. This phenomenon has to do with something called the “Carbon – Nitrogen Ratio” which will be discussed in our March issue of Betty’s Garden Diary under a section devoted to composting. Nitrogen will also leave the soil through a process known as denitrification if the soil becomes flooded. Microorganisms in the flooded soil break down the organic matter and release the nitrogen into the air as nitrous oxide or in other gaseous forms.
Helping to pick some sweetcorn!
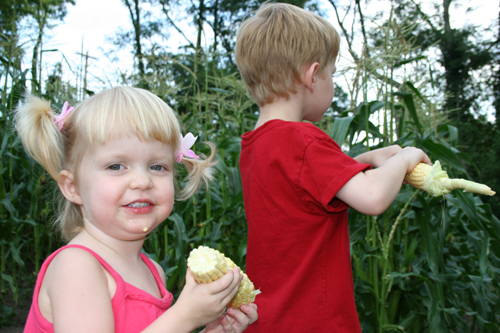
Sweet corn needs plenty of nitrogen in order to grow healthy stalks and produce a good crop.
Garden crops that need to grow lots of foliage or large plants need to have plenty of nitrogen. Sweet corn is one of those. It needs to have plenty of nitrogen available to grow the large cornstalk. You can easily add some nitrogen by working a little urea into the soil before you plant the corn. Urea is a naturally occurring substance that is found in some types of animal manure, but the urea sold in the garden center is man-made. Urea has a fertilizer formula of 45-0-0 meaning that it consists of 45% nitrogen, but provides no phosphorous or potassium. Urea is readily available in the garden center and is often sold as lawn fertilizer. When you buy it, be sure to avoid any bag that contains lawn herbicides which will kill some of your garden plants. Urea must be worked into the soil or it will absorb moisture from the air causing it to break down and release the nitrogen into the air as ammonia. Even though the corn has to grow a large stalk, you only need to add a tiny amount of urea to your soil. If your corn plants are showing a lack of nitrogen, you can always side dress them with a little more urea by just putting it about three or four inches from the rows and working it into the soil. A tiny amount of urea can also be beneficial for any of your leaf crops such as lettuce, and cabbage or for your onions. Be careful not to add very much urea or other nitrogen fertilizer to your tomatoes and peppers or to plants like beans or peas. If you over fertilize those crops with nitrogen, you will get very large plants with no fruits or with fruits that come on very late in the season. We made that mistake on our tomatoes several years ago. Our tomato plants grew to be over five feet tall, but we had no tomatoes until September!
Mulched with Grass Clippings.
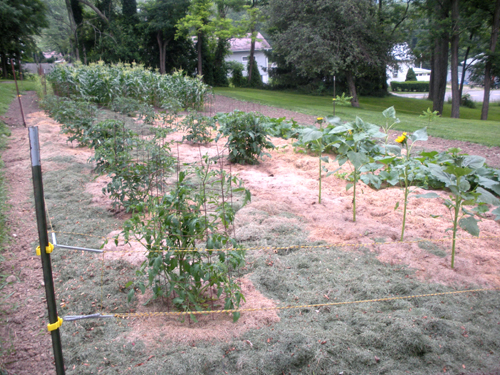
Note the springs on the electric fence. Our March issue will include a section on how to safely construct and maintain an electric fence to protect your garden from unwanted visitors like deer.
For the last ten years or so we have not used commercial fertilizer on our garden with the exception of a small amount of urea on our sweetcorn as mentioned above. We mulch almost everything in our garden with a very thick layer of grass clippings. Our lot in West Liberty is 2/3 of an acre. In addition, we have access to clippings from a couple of nearby lots. By weight, grass clippings are 80% water, so we usually try to mulch with two to three inches of clippings. After the clippings are on the garden for a week or so, three inches of green clippings become about an inch of mulch. If we have enough clippings, we even mulch between the sweetcorn rows. By the time our vine crops start to spread, they have a nice layer of clippings to keep the fruit off of the ground. Grass clippings contain 4% to 5% nitrogen, so a three inch layer provides plenty of nitrogen for most of our garden crops. Last summer, we had a lot of clippings, so we mulched between the corn rows with 3-4 inches of grass clippings. Rainwater leaching through the clippings provided enough nitrogen for the corn and we had a bumper crop without adding any extra nitrogen fertilizer.
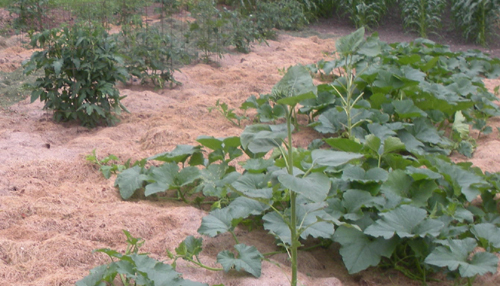
We are fortunate to have access to plenty of grass clippings for Betty’s Garden.
The best way to determine the levels of the major plant nutrients in your soil is to have your soil tested for free through the WVU Soil Testing Lab. Just go to http://soiltesting.wvu.edu for more information. In addition to telling you how much each of the major soil nutrients your garden soil contains the soil test results will also indicate the acidity level of your soil which will be reported as the soil pH. A soil pH of 7 is neutral. If your soil pH is above 7, the soil is slightly alkaline and if it is below 7 the soil is acidic. The ideal soil pH varies slightly from crop to crop, but most garden crops do best if the soil pH is between 6 and 7. Over fertilization with calcium, phosphorous, or potassium will increase the pH. Most of the topsoil in our area tends to slightly acidic. If your soil test results show a low pH indicating acidic soil, the lab will recommend the amount of agricultural lime to add to correct the pH. Unfortunately, the best time to take samples for a soil test is in the fall after you have tilled your garden for the winter.
Let’s talk about winter cover crops. A lot of gardeners will plant a crop like winter rye after they till their gardens each fall. The cover crop grows all winter and is worked into the soil in the spring. Most of the gardens in this part of the country are on hillsides, so a good cover crop will help to reduce erosion by slowing the speed of the runoff water during winter and spring storms. The cover crop also adds a small amount of organic matter to the soil which helps to improve the soil structure. In addition, the cover crop absorbs and holds a small amount of the plant nutrients in the soil which are then released as the cover crop breaks down after it is worked into the soil. The only disadvantage to a cover crop is that it holds moisture and also slows the rate at which the soil dries in the spring, so it could delay the spring tilling for a short time. In the past, we have grown winter rye on Betty’s garden, but are currently not doing so because we want to be able to till our garden as early as possible in the spring. Part of our garden has soil that is high in clay content. With the winter rye cover, it remains too wet to work until very late in the spring.
If we work the soil when it is too wet, we can damage the soil structure thereby affecting the soil tilth. Soil tilth is the overall suitability of the soil to grow crops. It includes all of the things that we have discussed so far along with the soil structure. “Soil structure” refers to how the sand, silt, and clay soil particles stick together to form clumps that soil scientists call “peds.” We always called them “clods.” If we rototill the clay soil in the upper part of our garden when it is too wet, we produce big wet clods (peds). When they dry out, they are very hard to break apart. If we walk or drive our lawn tractor on that part of the garden when it is wet, and then try to till it after it has dried, it gets very hard. Our management of the soil has a huge impact on the formation of the clods (peds) in our garden and those peds are important to the soil tilth because they determine how much pore space is in the soil. Earlier, we mentioned that the topsoil in your garden could be 50% air and water by volume depending on how much it was compacted. The pore spaces in the soil provide for underground drainage and hold the water and air that your plant roots need, so it is very important to use gardening practices that promote the development of a range of soil peds (clods) which will produce those spaces. The goal is to have soil clumps with enough structure to hold together without becoming too hard to break apart.
The key to good soil structure is good soil management. We have already talked about the importance of increasing the amount of organic matter in the soil. In addition, you can improve the soil structure by the manner in which you till the soil. If you till clay soil when it is too wet, your tilling equipment will compact the clods by squeezing the pore spaces out of them thereby making them very hard. The result will be large hard soil peds that are almost impossible to break up. All you seem to be able to do with them is to make them into smaller hard clods! If you pick up a handful of soil and squeeze it and it sticks together in a hard ball, then the soil needs to dry out a little more. Be careful not to over work your soil. If you work the soil until is like fine powder, then the first rainfall will cause the top couple of inches to form a hard crust which may block the emergence of the sprouting seeds. In addition, the rain water will carry the fine clay particles into the pore space in the soil thereby reducing the air and water movement in the soil. For the best results you should have a nice mixture of different sized soil aggregates. After you have succeeded in creating great soil structure, then protect it. Do not walk or drive on it any more than necessary and never drive or walk on it when it is wet or you will compact the soil and destroy the structure.
It doesn’t matter if you are planting a container garden on your deck or a few raised beds in your back yard, or a half acre truck garden or a thousand acre cornfield, everything discussed in this installment of Betty’s Garden Diary applies. If you are a first-time gardener, remember that it is not as complex as this page might make it seem. Don’t let all of the stuff in this article keep you from planting and enjoying your garden. By the way, we will be planting our onion seeds in just a couple of weeks around the first of March! Spring is just around the corner!
Remember to keep posting your comments and suggestions so that we can make Berry’s Garden Diary a community effort.


