Betty’s Garden Diary March, 2016
Spring is just around the corner! In this issue of Betty’s Garden Diary, we are going to discuss selecting a location for your garden, composting, starting bedding plants, spring plantings, and protecting your garden from deer and other unwanted visitors including safely constructing an electric fence.
Growing Bedding Plants
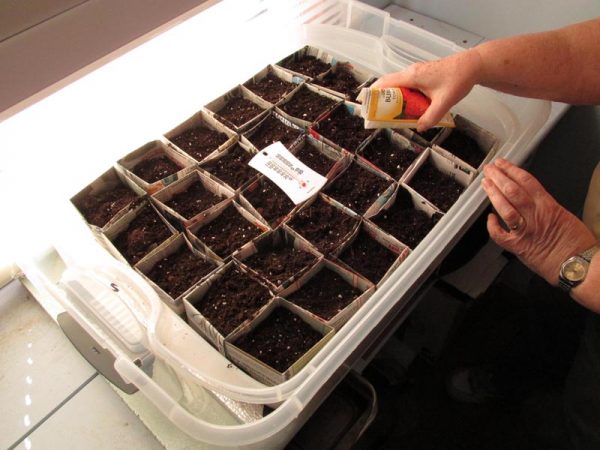
If you have not already done so, now is the time to start your bedding plants. Our cabbage and onion plants are up, and our tomato and pepper plants will be started by mid-March. We use a large plastic box for a germination chamber. A heating pad placed under the box provides enough heat to maintain a temperature of 80 degrees inside. The lid prevents the soil in the seed flats from drying out. We germinate the cabbage, tomato and pepper plants in the newspaper pots inside plastic containers that fit inside the germination chamber. We place one or two seeds in each newspaper pot so that they do not need to be transplanted. As soon as the seeds are germinated, we remove the flats containing the pots from the germination chamber to prevent fungal growth which would cause the seedlings to die. On sunny days, we place the seedling trays outside on our deck where they get a few hours of full sun and the soil surface dries thereby preventing fungal growth. After a week or so, we remove all but one plant from each pot and then transfer the pots into the cold frame located on the southern side of our house. By putting the seed flats on the deck for a few hours every day, we gradually harden off the plants before putting them into the cold frame. We close the cold frame at night. It contains a light strip which provides a small amount of heat on cold nights. If a nighttime freeze is predicted, we put a tarp over the cold frame for added insulation. We also put the sensor for a wireless indoor-outdoor thermometer inside the cold frame so that we can check on the temperature from inside the house.

What to Plant Now
As soon as our garden dries out enough, we will do our spring tilling and then we will plant onion sets, cabbage plants, and sugar snap peas. Betty’s dad always said to plant your potatoes on Good Friday which falls on March 25 this year. If the soil is dry enough and the weather has been reasonably warm, we usually plant some sweet corn around the last week in March. We have only lost it to a freeze one time during the last twenty years or so. Now is the time to set fruit trees and shrubs and to set strawberry plants. It is also the time to plant asparagus. Be sure to check the WVU Garden Calendar for their recommendations about planting times. When you till your garden, the soil needs to be dry enough so that the clumps of soil crumble apart when you squeeze them. If they are sticky, then the soil is too wet to work. Avoid overworking the soil. Remember that you want an array of different sized soil aggregates to provide the pore space that permits good air and water movement through the soil. If you work the soil into a powder, the first hard rain will carry the fine clay particles into the pore space and block them up forming a hard crust that germinating seeds may be unable to break through.
Selecting a location for your garden
If you are new to gardening, your first consideration will be selecting a spot for your garden. We realize that you may not have many options depending on where you live and how much space is available. If space is limited, you may want to consider container gardening or intensive raised bed gardening. Container gardening is an option when space is very scarce since the containers can be located on a deck or in limited spaces. If you are thinking of trying container gardening, click this link to visit a great University of Illinois web site on container gardening.
If you have a little more space, here are some things to consider when you are selecting the location for your garden. The first is the nature of the soil. Dig a few test holes to determine if the area has a good layer of topsoil. Some backyards have virtually no topsoil. Poor home construction practices and erosion sometimes result in the loss of topsoil. If you cannot find a location on your lot where there is a good layer of topsoil, then consider raised bed gardening so that you can treat each raised bed like a giant planter box and fill it with your own topsoil mix. If you are interested in more information about raised bed gardening, click this link to access a University of Missouri Cooperative Extension Service web site about raised bed gardening.
In most cases the absence of topsoil will not be an issue, so the next two things to consider are sunlight and water management. Most garden crops need full sunlight, so the best location is a spot that is not shaded at any time. However, you have to use the ground that is available, so try to find a spot that is sunny for most of the day. Betty’s garden gets some shade early in the morning, but is in full sun until late in the evening when part of the garden is shaded by a tree on an adjoining lot.
The other important factor is water management. Your garden needs to be well drained because standing water will kill your crops. Our garden is on the southern side of a hill, so drainage is not as much of a problem as managing water runoff to prevent erosion. We do that by mulching with lots of grass clippings and by using tillage practices that leave the soil surface somewhat rough. If your garden has any nearby trees, they will remove the water from the soil causing problems for your garden plants. Remember that the underground part of a tree is as large as the above ground part of the tree. However, the underground part tends to spread out horizontally. Last summer, we dug a hole to replace a water hydrant about fifty feet from the silver maple tree in our side yard. When we were digging the ditch for the hydrant, we had to cut through some roots the size of my arm. The grass in that part of our yard tends to be a little sparse because the two trees over there remove so much water from the ground. Keep your vegetable garden as far from the trees as possible.
Protecting Your Garden from Animals
After you have decided on a location for your garden, the next consideration is how to protect it from raccoons, rabbits, deer and other unwanted furry diners who would wipe it out. Some gardeners choose to build a wire or plastic fence around their garden. A small herd of deer makes its home in the woods near the West Liberty Cemetery just up the hill from our home. They are frequent visitors to our back yard. In order for us to keep them out of our garden with a wire fence, it would need to be eight to ten feet tall so that they could not hop over it. The Internet is full of other options for keeping animals out of your garden. You will read about everything from gathering human hair from the local barber shop and spreading it around your garden to scattering blood meal around. Several years ago, Purdue University studied them all and determined that the only two options that actually worked were either a very high wire fence or an electric fence. Of the two options, the electric fence was the far less expensive choice.
Building an Electric Fence
We use an electric fence to protect Betty’s garden and it has been safe and effective. For as long as I can recall while growing up on the farm in central Ohio, we safely ran an electric fence. At times, we may have had close to a mile of wire out without causing harm to birds, animals, or humans. If you are considering using an electric fence, your first questions are probably about safety, so we will start with that topic. An electric fence is safe for humans and animals if it is correctly installed using an approved electric fence charger. There are two types of electric fence chargers, but both operate on the same general principal. They create a high voltage electrical pulse similar to a static electricity discharge, only more powerful. The two types of fence chargers are battery powered or powered by AC. Some battery powered fence chargers come with solar panels that recharge the batteries. Because of the solar panels, they tend to be more expensive, but you don’t need to worry about forgetting to check on the batteries. Back on the farm, we had a battery powered unit that we connected to an old tractor battery. I loaned that unit to a friend a couple of years ago and it is still in use today! Here at Betty’s garden, we use a fence charger that plugs into a standard 110 volt household outlet. Inside the fence charger, there is an induction coil similar to the induction coil that provides the spark to the spark plugs in your car engine except that the output is not as powerful. The induction coil provides brief pulses of high voltage, low amperage current to the fence. Never attach an electric fence wire directly to a 110 volt power line. Also, before installing an electric fence, make sure that there are no town or city ordinances that outlaw electric fences where you live.

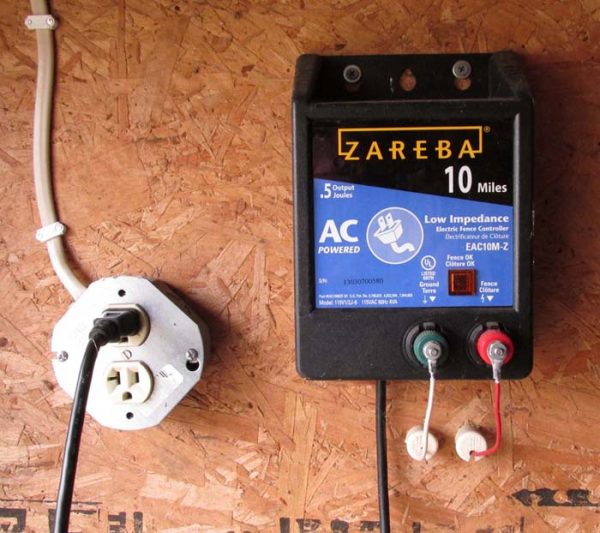
Electric Fence Charger. The wire from the green terminal is connected to a ground rod and the wire from the red terminal is connected to the fence. Not that the wires are routed through PVC pipes to the outside of the building . The pipe caps with slits for the wires are to keep insects out of the pipes.
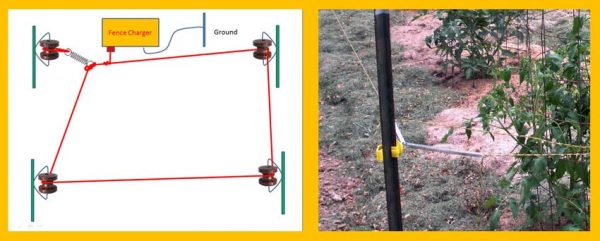
As you examine your electric fence charger, you will notice that it has two output terminals. One of them is the ground. It connects to a pipe or rod driven into the earth. Check the instructions that came with your fence charger. The photo above shows how our fence charger is connected. In order for the animal to get a shock from the fence, the circuit must be completed. The rod driven into the earth causes the ground to become part of the circuit. The charger sends pulses of electricity into the fence wire which is connected to the posts with insulators. When an animal walks up and touches the fence, it completes the circuit between the fence and the ground and gets a harmless but uncomfortable shock. Late last summer, I accidentally touched our electric fence while clearing some tomato branches from it. However, I did not get shocked, so I put my hand onto the fence. When I still didn’t get shocked, I picked up a hoe and shorted the fence to one of the steel posts. It produced a spark showing that it was working. Then, I realized that the hiking boots I was wearing had thick rubber soles and the ground was bone dry, so I wasn’t grounded. It is common to see birds perched on the top wire of our electric fence. They don’t get shocked because they are not touching the ground. In order for one of them to get shocked, it would have to come into contact with one of the steel posts. If you are concerned about birds coming into contact with the posts and being harmed, just use the long insulators which put the wire several inches away from the posts. Instead of solid wire we use the plastic electric fence wire that is available from the local farm stores. It consists of strong plastic cords with thin wires spiraled around it them. It is very easy to use compared to solid wire because it can be cut with scissors and tied together like string. It also expands and contracts less than solid wire as the temperature changes throughout the hot summer days. We add a small spring to each wire on one corner to keep it tight and to provide a little give in case an animal goes through it. We put the first wire about three inches above the ground and a second one three to four inches above the first to keep rabbits and raccoons out and then add a third wire about three feet above the ground to deter the deer. Last summer, some deer jumped the top wire and got into the garden, so we added a fourth wire a foot or more above the top one. We use a little homemade wire hook to hold each wire onto the insulators on one corners post at each end of the garden so that the wires can be taken down to provide access for the rototiller during the summer. Remember to leave plenty of space between your electric fence and your garden crops so that they don’t touch it and short it out. You must also keep the fence clear of grass and other vegetation which would short it out.

We use small springs from the local farm supply store to keep a little tension on the wires.
Creating a Compost Pile
While you are selecting a location for your garden, consider where to put your compost pile or bin. Of course you can garden without composting, but the single best way to improve the fertility of your soil is to add organic matter. However, raw organic matter can actually compete with your garden plants for soil nutrients, so most things should be composted before working them into the soil. The University of Illinois Extension Service has a great web site on composting which you can visit at this link, so this discussion of composting will be brief. A good compost pile contains a mixture of different things because some materials compost more quickly than others. This is due to something called the Carbon – Nitrogen ratio. If adequate moisture is present, the ideal carbon-nitrogen ratio for composting is 20-1 to 30-1. Materials with a carbon – Nitrogen of over 25-1 should always be composted before they are added to the soil to prevent them from competing for nitrogen with your garden crops. Constructing a compost pile is easy. Just layer different materials and add a little topsoil between the layers. Some things that you should avoid adding to your compost pile are: diseased plants, weeds that have gone to seed, quackgrass rhizomes, walnut shells and leaves, and grass clippings from a lawn that has been chemically treated. For safety reasons, human waste should also be avoided. If you are composting kitchen scraps, be sure to bury them deep in the compost pile or the neighborhood cats, dogs, and raccoons will dig them up! Lots of table scraps can be composted, but remember that bones do not break down and fats like bacon grease or used cooking oil should not go into the compost pile. Visit the University of Illinois web site for a table showing the carbon-nitrogen ratios of common materials. Remember that things with high carbon-nitrogen ratios like sawdust, shredded paper, wood chips and straw take a long time to break down. We compost chopped fall leaves for almost a year before adding them to our garden.

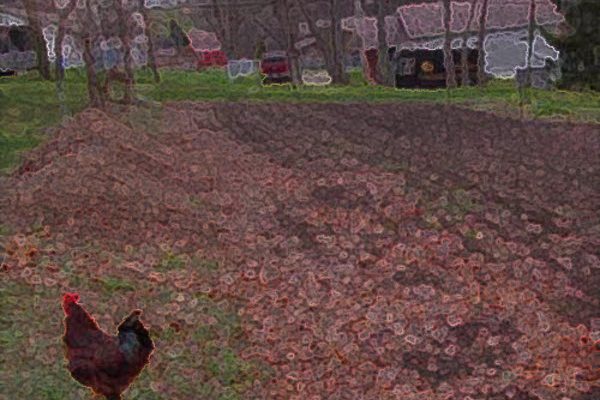
Our compost pile is on the left along the side of the garden. We compost fall leaves for an entire year.
Pruning Fruit Trees
If you haven’t already done so, now is the time to prune your fruit trees. Since Pennsylvania State University has a great pruning guides online at this address, this discussion will be brief! When you visit the PSU web page just click the link for the type of tree to reach the pruning page. You can prune trees and shrubs any time, but doing so before they break dormancy will put all of the energy of the tree into the branches that are left and the new growth. In most cases, pome fruits like apple and pear trees are trained to a central leader while stone fruits like peaches, plums, and apricots are trained to an open center. In all cases, you will want to remove any dead branches and any branches that cross over or rub against other branches. Most of the time, you will also want to remove any water sprouts. No matter what you are pruning, you will be making one of two basic cuts. Those are called heading or thinning. A heading cut involves clipping off the tops or tips of the branches. By cutting off the top of the branch with its growth bud, you will cause the lateral buds on the branch to grow thereby thickening the tree. A thinning cut involves removing the entire branch. Thinning cuts are made right against the trunk or another branch. When you make thinning cuts you may want to start out with a small cut under the branch to prevent the falling branch from peeling away part of the bark on the trunk. Although most trees and shrubs should be trimmed while they are dormant, there are some exceptions. All of the flower buds for your flowering crab apple trees and your forsythia bushes are on them now. If you prune those now, you will remove those flower buds, so wait until you have enjoyed the flowers from them this spring and then prune your crab apple trees and forsythia bushes after the flowers are gone.
If you have any grape vines, they should also be pruned while they are dormant. Your pruning method will depend on how you are training the grapes. For example, you may have them on a trellis or an arbor or you may be training them along wires using a three or four arm Kniffin system. Check out the Penn State Web page for complete details about how to prune your grape vines, just click the link for grapes and the pruning links will be at the bottom of the page.
Please remember to contribute your comments and help to make Betty’s Garden Diary a community effort!


