

While this is being written, it is three degrees in West Liberty and Betty’s garden is white with snow. However, the seed catalogs that have appeared in our mailbox have brought on our annual spring fever. Even in midwinter, there are some things that you can do to help with that Spring Fever. This is a good time to clean and sharpen your garden tools. If you are like us, your long-handled tools are in the shed or garage where they were left the last time you used them. They are likely covered with dirt and you probably haven’t cleaned and sharpened them in some time. The photo below shows some of the hand tools that we use in our garden before we cleaned and sharpened them.
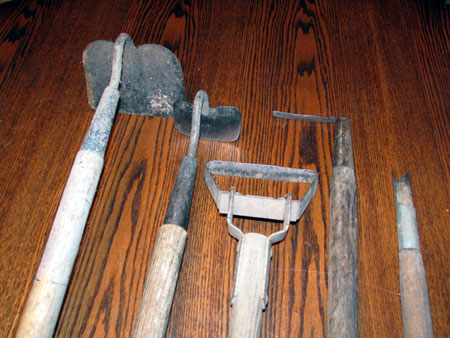
On the left is a traditional shaped hoe. Next to that is a traditional hoe that has been cut down in size. When I was growing up on the farm in central Ohio, there was one old worn hoe that was much smaller than normal. We would fight over who got to use that old hoe because it was a lot easier to get through hard soil, so I cut down an ordinary hoe to make one like it. The “L” shaped tool (Second from the right) is a homemade long handled “Cape Cod Weeder.” It was made out of a broken rake. Click here to see a video of a short handled Cape Cod Weeder in use. It is great for removing small weeds from around garden plants without having to stoop down. If you want a Cape Cod Weeder, you will be able to purchase one online.
The odd-looking tool in the center of the above picture is called a “Scuffle Hoe” or “Stirrup Hoe.” To use it, simply scuffle it back and forth just under the soil surface to eliminate small weeds. Using the scuffle hoe, one can cover a lot of ground in a hurry. Click here for a YouTube video of a scuffle hoe in use. I recommend using it before your weeds get as big as the ones in the video! The scuffle hoe actually works better when it is a little dull. If it is very sharp, it cuts the weeds off, but it pulls the weeds out when it is a little dull, so I am not going to sharpen ours this year. The tool on the far right is a weeder made from an old section of ¾ inch galvanized electrical conduit and a rake handle. We use it for removing thistles and dandelions from our lawn and gravel driveway. You can make one just like it if you have a hacksaw and a file! You can obtain the rake handle and electrical conduit from a home improvement store. It is an easy and fun project for any handyman. The metal part is held onto the handle with a tiny nail driven through a small hole drilled in the pipe.
The fastest way to remove rust and soil from your tools is a sanding disk on an electric drill or a whisker wheel on a bench grinder. Don’t forget to also clean all of the parts of the handle. After removing the soil, sharpen the blades using a grinder or a file. When you prepare to sharpen the traditional hoe, you will notice that the blade edge has a single bevel which is located on the side opposite from the handle. Sharpen that type of hoe on the side opposite from the handle, trying to maintain a bevel of about 30 degrees. For safety reasons, be sure to clean your tools before you begin to sharpen them. A good file works well for sharpening most things. If the tool is very dull or has an edge that has been damaged, you may need a bench grinder. When you use the power tools, remember your safety equipment, especially your eye protection. As you sharpen the hoe, you will create a wire edge on the opposite side of the blade from the bevel. Use a file or sharpening stone to remove the wire edge. Our cut down hoe and the Cape Cod weeder are both sharpened on the handle side. After your tools are sharpened, wipe the blades with a light coating of oil. Don’t neglect the wooden handles. Wipe them with a coating of linseed oil. The linseed oil will help to protect your tool handles when you forget them and they end up out in the rain! Be sure to use the linseed oil in a well ventilated place and do not keep rags saturated with linseed oil in your house because linseed oil saturated rags have been known to spontaneously catch on fire.
If you are planning to grow your own bedding plants, now is the time to begin to make the preparations! Obviously, you will need to order the seeds. You may want to consult the WVU Extension Service Garden Calendar for the vegetable varieties that they recommend. If you have not already obtained a copy of the WVU Extension Service Garden Calendar, just click on this link to visit their web page.
Some of our favorite varieties are not listed on the Garden Calendar. Here are some of the varieties that we usually grow:
- Cabbage: Flat Dutch and Stonehead
- Tomatoes: Rutgers, Early Treat, and one of the beefsteak varieties
- Peppers: California Wonder, Jalapeno, and Caballero. Caballero is a very popular version of Poblano chili pepper with a Scoville heat rating of 1000-2000. (Jalapeno peppers have a Scoville rating of 2500 – 5000.)
- Peas: Sugar Snap
- Green beans: Blue Lake Bush Beans
- Sweet Corn: Ambrosia and Early Sunglow. Ambrosia is a super sweet variety and Early Sunglow is the earliest variety.
In addition, we will grow onions from seeds, but do not have a preferred variety. We will order our pepper, tomato, onion, and cabbage seeds from one of the seed catalogs. The seeds for corn, green beans, beefsteak tomatoes, and Blue Lakes Bush beans are usually available locally.
By the way, we grow onion plants from seeds because the resulting onions usually keep better than onions grown from sets. Onions are biennials, meaning that they bloom every other year. Most of the onion sets that you buy are already one year old, so they will put up a seed stalk around mid-summer. Although you can remove the seed stalks, the onions often split into two parts. They tend to spoil in the area between the two halves. Onions grown from seed do not put up a seed stalk and do not usually form double bulbs, so they keep better. Some of the local stores sell onion plants if you do not want to grow your own. You can also order them online through the seed catalogs. If you grow your onions from sets, be sure to use the double onions first. Our strategy is to grow some onions from sets and some from plants that we grow from seeds.
Now is a good time to prepare an indoor area for growing your seedlings. The most important things to consider are heat, light, and moisture. You will need to be able to maintain a temperature of just under 80 degrees to germinate most seeds quickly. Our solution to that problem was to make an insulated germination station using foam insulation board which we obtained from a local home improvement store. We place a large plastic container with a transparent cover into the foam box as a germination chamber. A heating pad with a control helps us to maintain the 80 degree temperature. Since we will be starting some of our seeds in early March, now is the time to make the preparations for doing so. Our indoor grow area consists of a two foot by ten foot shelf with two four-foot fluorescent lights hung above it.
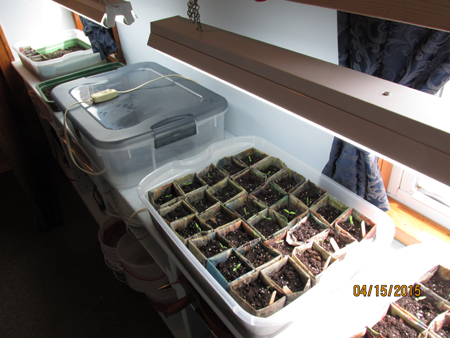
The picture above shows our indoor grow area. It was taken early last spring. The flats are plastic boxes from a local department store. The flat in the foreground contains tomato plants that were germinated in the newspaper pots. There is a layer of sand under the pots to provide drainage. The flat in the far background was being used to fill pots when this photo was taken. The covered plastic box in the middle was in use as our germination chamber. Although the perspective of the photo doesn’t show it, the flat in the foreground fits completely inside the box that is in use as a germination chamber. The control for the heating pad under the germination box can be seen on top of the box. When this photo was taken, the foam insulating box was not in use because the room was quite warm. The cover on the germination box serves to help keep the soil from drying out. Condensation on the underside of the cover is visible in the photo. Our early March Betty’s Garden installment will include more complete instructions for growing bedding plants. However, this is the time to plan and prepare your indoor grow area.
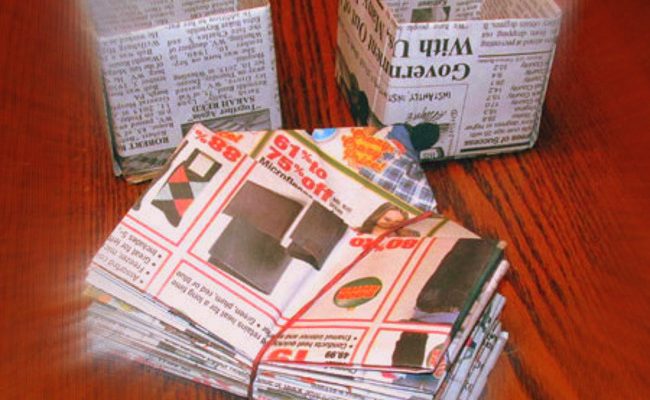
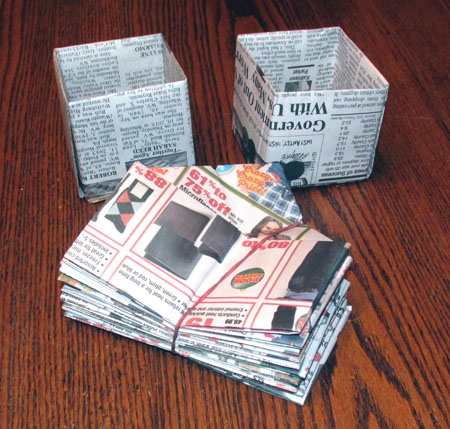
We plant all of our seeds into three inch square pots made from newspaper pages. The photo above shows some of those pots in use. When the time comes, we will arrange the pots in the plastic trays on top of a layer of sand. However, this is the time for making the pots. Making the pots is a little like doing origami. It is fun, but it will take you some time to make forty or fifty of them, so get started. This YouTube Video will show you how to make the pots. Betty came up with a nifty trick to create a small drainage hole in the center of the finished pot. She just cuts off a tiny amount of the folded corner when she is making the pot. If storage space is at a premium, just keep the pots folded flat until you are ready to use them as shown in the picture below. Since we are going to grow quite large bedding plants, the three inch pots are the perfect size because they hold a good amount of soil.
Remember to run the small engines on your outdoor power equipment at least once every month during the winter. When you start the engines, be sure to run them long enough to bring them up to the full operating temperature which usually takes at least 15-20 minutes. Running the engine to full operating temperature is important to prevent moisture from condensing in the exhaust system or elsewhere in the engine. It also helps to lubricate the internal parts of the engine. It is especially important to run any outdoor equipment that has a battery in order to maintain a full charge in the battery. A discharged battery can actually freeze and burst, causing damage to your equipment.
Be sure to watch for the February issue of Betty’s Garden Diary. It will include more information than you ever wanted to know about soil and soil fertility.
Remember to add your comments and ideas so that this gardening column becomes a community effort.