

Welcome to Betty’s Garden Diary for July, 2016!
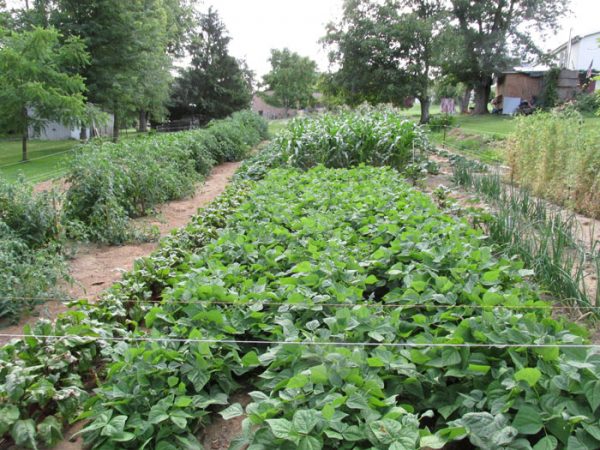
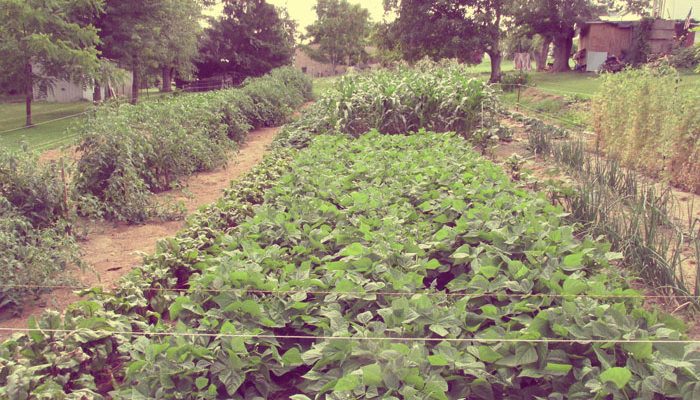
Betty’s Garden on July 14, 2016
Things are going well in Betty’s garden. God has blessed us with plenty of timely rain showers, so things are growing like crazy! We have made most of our cabbages into sauerkraut and are harvesting Okra, peppers, tomatoes, beets, zucchini, cucumbers, sugar snap peas, green beans, sweetcorn, and onions. The Early Sunglow corn provided us with our first sweetcorn on July 8 and we have had a continuous harvest since then. At this time of year, all of the various insects that love garden plants create our biggest challenge since they could wipe out a crop within a week or two. Therefore, this edition of Betty’s Garden Diary will focus mostly on insect control. Next month, we will discuss how we preserve some of the bounty from our garden.
Before we tackle the bugs, we will describe what we did with our cabbages. Our sauerkraut recipe came from the old “Ball Blue Book” published fifty years or more ago by the Ball Corporation. The Ball Corporation was headquartered in Muncie, Indiana where they manufactured and sold Ball mason jars for home canning for many years. The Ball Blue Book provided folks with recipes and instructions for home canning, so it was found in every farmhouse in the Midwest. The Ball Blue Book instructions for making sauerkraut are available online at this address. Just put “sauerkraut” into the search box. The Penn State University Cooperative Extension Service provides another great recipe for homemade sauerkraut at this address. The Ball Book Recipe calls for one cup of canning or pickling salt for 25 pounds of cabbage. The PSU Recipe calls for three tablespoons of salt for every five pounds of cabbage which works out to 15 tablespoons of salt for 25 pounds of cabbage. Since there are 16 tablespoons in one cup, the PSU recipe calls for slightly less salt than the old Ball Recipe. We like the brine recipe in the PSU version. It calls for 1.5 tablespoons of salt in a quart of water or three tablespoons of salt in one half gallon of water. (BTW – I bought a new Ball Blue Book at Lehman’s Hardware earlier this month. The current recipe in the Ball Blue Book is identical to the PSU recipe.)
We start out by harvesting enough cabbages to make 25 – 30 pounds of Kraut. To keep some of the mess out of the kitchen, we remove the outer leaves and trim out any bad spots while we are in the garden. When we have harvested enough to make a 25 pound batch or a 12.5 pound half recipe, we take the cabbages into the kitchen and wash them. Using an old fashioned style slaw cutter that we obtained from Lehman’s Hardware in Kidron, Ohio, we shred the cabbages. We double cut them to obtain the consistency that we like. Then, we use a kitchen scale to weigh the shredded cabbage to make sure that we have exactly 25 pounds. If we have more or less, we adjust the amount of salt accordingly. Then, we divide the shredded cabbage among three good sized food safe plastic containers and sprinkle 1/3 of the cup of salt over the cabbage in each container. After we mix it well, we combine the three containers into one large container and mix the entire batch together. After the cabbage is salted, we take a break for at least half an hour to allow the salt to begin to pull water from the cabbage. After waiting 30 – 60 minutes, we pack the cabbage into two gallon clear glass crocks to ferment. We got the glass crocks from a local department store a couple of years ago for $9.99 each. I think they are now around $12.00 each and they come with glass lids. We use an 18 inch long section of 2×4 as a tamper to pack the cabbage into the crocks. Be sure to sand all of the splinters off of the 2×4 and make sure it is clean enough to use with food! Add the cabbage to the crock in small quantities and press it down firmly. Juice should almost immediately come to the top. We fill each crock to within about two inches of the top which amounts to half of the 25 pound batch of cabbage. Then, we make the PSU brine recipe by adding three tablespoons of canning salt to two quarts of water. After making sure the salt is all dissolved, we pour the brine into a one gallon zipper bag and force out all of the air. We turn the sealed bag upside down to test it for leaks. The one gallon bag perfectly fits into the crock on top of the cabbage sealing out all of the air. After adding the glass lid, we put the crock into the basement to ferment. We ferment the sauerkraut in a portion of our basement that maintains a pretty consistent temperature of around 72-73 degrees and is dark most of the time. Although it only needs about a month to ferment, we usually wait a couple of months before canning the finished sauerkraut. It could actually stay in the crocks all winter!

Sauerkraut in Glass Crocks
When we are ready to can the sauerkraut, we remove the brine filled bags and rinse them off with cold water. Then, we carefully skim off any scum or spoiled cabbage that was around the brine bags. We will even wipe the inside of the tops of the crocks with paper towels to remove any undesirable material. We transfer the entire 25 pound batch including the liquid into a large stainless steel stockpot and put it on the stove at medium heat. I like a little extra liquid for my mashed potatoes when we make sauerkraut and spareribs, so we add some of the brine from the bags to the pot. The extra brine also helps to keep the kraut from sticking and burning as it is heated. As we heat the kraut, we stir it frequently to prevent it from sticking and burning. When it begins to simmer, we turn off the heat and pack the kraut into clean quart sized mason jars and can it as described in the Ball Blue Book or on the PSU web site. As long as the jars stay sealed, the homemade sauerkraut has a very long shelf life.
In addition to the sauerkraut, we will can green beans, tomatoes, salsa, and pickled beets from our garden. We are freezing sugar snap peas, sweetcorn, peppers, and okra. If we have a lot of corn, I am also going to can some of it in pint jars. The nice thing about preserving food from your own garden is that you know what chemicals have been used to produce that food. For example, the cabbages for our sauerkraut were fertilized by the small amount of nitrogen which was provided by the grass clipping mulch and no artificial fertilizer was used on them.
However, we are not opposed to using agrichemicals if they are needed. In mid-June, I had an opportunity to walk around a community garden compound in central Ohio. Each person had paid a small fee to have a garden plot which measured about fifty feet square. The town worked up the soil and assigned the plots. Then each individual or family planted and cared for their own garden. Some of the gardens were amazing. They had ripe tomatoes and sugar snap peas and potato plants which were twice the size as ours. Other gardens were not so good. One person or family had covered the entire plot with black plastic and then planted tomatoes and peppers through holes in the plastic. Nearly all of the plants had died from lack of water. One garden had lush potato plants while another garden had potato plants which had been stripped to the stalks by Colorado potato beetles. The damaged plants were white with dust, but the damage had clearly been done before the insecticide was applied. By July, the garden insects are open for business around here. Left uncontrolled, a severe infestation can completely destroy a crop within a week or two. The Internet is full of home remedies for insects. Most of them involve spraying or surrounding the plants with something other than an insecticide. We are not going to promote or try to discredit any of those home remedies, but it is important to remember that you may be coating your food with something that is not meant to be eaten when you spray your plants with liquid soap or Epsom salt or mothball tea.
We are going to examine some of the options for controlling insects in your garden, but please do not use this document as your authority on the use of insect control measures. Although the information in the following sections was taken from authoritative sources, you need to do your own research before applying any of the chemical control measures discussed. If you are not sure what insects are munching on your garden plants, click this link to access a page containing pictures of eight of the most common garden insects found in our area.
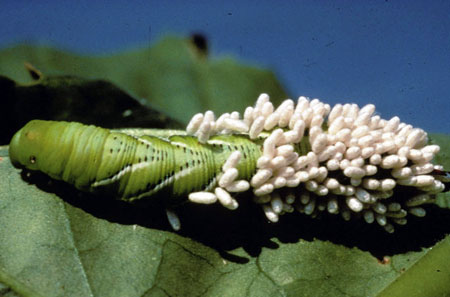
Bracnoid Wasps are natural enemies of tomato hornworms.
Several insect control options available to home gardeners. The first option is simply picking the insects or worms off of the plants and eliminating them! This is a good option for very small gardens or for small infestations of easily found and removed pests such as tomato hornworms, but it is impractical on larger gardens or for large infestations. The next option is to erect a physical barrier such as a row cover or plant cover using screening. We did just that to protect our rose bushes and the newly planted dogwood tree at West Liberty Elementary School from the cicadas. It is a good option if you want to protect four or five cabbage plants from cabbage worms or cabbage loopers, but becomes less practical for larger gardens or larger plants or smaller insects. Traps are the next option. For example, a couple of companies sell Japanese beetle traps which attract the beetles using a floral aroma and sexual pheromone scent pads. When we first moved into our home in West Liberty 38 years ago our garden was nearly destroyed by Japanese Beetles. We hung Bag-A-Bug Japanese beetle traps from several trees not far from our garden. For a couple of weeks, we bagged about a pint of Japanese beetles every day, but they still infested our garden badly enough to require treatment with an insecticide. Then, we learned about milky spore disease (Paenibacillus popillia). Milky spore bacteria are found naturally in the soil. They infect Japanese beetle grubs and provide a very effective biological control if enough of the soil surrounding your garden can be inoculated. The milky spore organism is very specific to Japanese beetles and is harmless to humans and other organisms. We applied milky spore to our entire lot and to part the adjoining lot with our neighbor’s permission. Over several years, the number of Japanese beetles diminished greatly. Today, they are rare in our garden. By the way, Japanese beetle grubs are a favorite food source for ground moles, so eliminating them might also reduce the mole population in your lawn. For maximum effect, be sure to apply milky spore as instructed.
Milky spore is an example of a biological control in which one uses a natural enemy of the pest to control that pest. Bacillus Thuringiensis (BT) is another great example of a biological pest control. BT organisms are also bacteria which are found naturally in the soil. Although they are mostly harmless to humans and other animals, BT bacteria are deadly to caterpillars and certain insect larvae that feed on garden crops. The BT bacteria thrive in the alkaline guts of those pests, but are destroyed by the acid environment in the digestive systems of most animals and birds and of humans. Unless they are exposed in very high dosages, honeybees are not harmed by BT, so it is a great option for controlling insects that are susceptible to it without creating a threat to honeybees and most other beneficial insects. BT must be eaten to be effective, so it only works on larvae that are actively feeding. The earlier in their life cycle that they ingest the BT, the more effectively it works. Some examples of larvae that are well controlled by BT are tomato hornworms, cabbage worms, cabbage loopers, corn earworms, Colorado potato beetle larvae if they are very young (it does not work against the older larvae or the adults), and Mexican Bean Beetle larvae if they are very young (it does not work against the older larvae or the adults). BT is sold under several brand names including “Thuricide”, “Bonide”, and “Safer Caterpillar Killer.” Apply BT as instructed on the product label.
Unfortunately, some of the insects that invade the vegetable garden cannot be controlled using biological solutions, so saving your crop requires the use of a chemical insecticide. Please understand that Betty’s Garden Diary does not pretend to be your authority for the proper use of insecticides. Before you apply chemical insecticides, do some research on the active ingredients and on the proper application procedures. Most of the chemical insecticides will kill beneficial insects in addition to the insects that you are targeting. For example, honey bees are very susceptible to Carbaryl which is marketed under the trade name of “Sevin.” Sevin is one of the most popular garden insecticides in the country. It is a contact poison, so the insect does not need to eat it for it to be effective. With normal exposure amounts, Sevin is not extremely toxic to humans, so it is a popular insecticide for home gardeners. (Click here for more information.) Because of the extreme toxicity to honey bees, the use of Carbaryl has been banned in several countries. Part of the problem is that the Carbaryl can be carried back to the hive with contaminated pollen and end up wiping out the entire colony. Other broad spectrum insecticides can also have the same impact on honey bees. The ongoing decline in the populations of honeybees in the United States poses one of the greatest risks to our food supply. As this article from Yale University explains, pesticide contamination is one of the complex factors contributing to that decline.
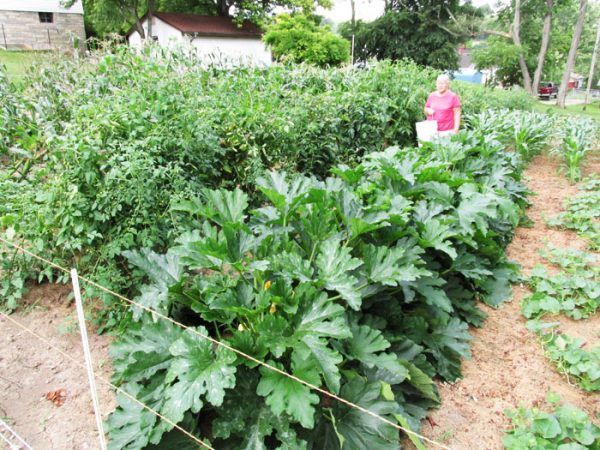
Harvesting Zucchini
Since Sevin (Carbaryl) eliminates most of the garden insect pests that are not controlled by BT or milky spore, we use it in Betty’s garden when we have no other choice. Sevin is a neurotoxin. It works by disrupting the nervous system of the insects. Humans who have experienced excessive exposure to Carbaryl exhibited neurological symptoms although the body eliminates Sevin fairly quickly. As gardeners, we need to educate ourselves on the proper use of insecticides before we start applying them so that we can protect ourselves, those around us and the environment. Home gardeners often apply way too much insecticide. The plants will be white with dust or spray residue when a tiny amount is really all that is needed. Read the label on the insecticide and carefully follow the application instructions. Go online to reputable web sites and research the products that you are planning to use. Cooperative extension service web sites from several states provide great information about the use of chemical insecticides. Sevin and some of the other insecticides can be absorbed through the skin or inhaled. Always wear gloves, long sleeved garments, and long pants when you apply a chemical insecticide. If you are applying the insecticide as dust, do so early in the morning when there is no wind. The dew on the plants will help the dust to adhere. Apply spray in the evening or morning when the wind is calm. Be very careful to control over spray. If you are using a duster, be aware of any dust cloud that you are generating. Even a very slight breeze can carry that cloud of dust or spray mist onto neighboring land. If that land happens to contain a crop where honeybees are working, your cloud of dust or vapor could devastate those bee colonies. Do not over apply the insecticide. Also be aware of other garden crops that are ripening. You do not want that spray or dust that you are applying to your cucumber plants to contaminate your beans or tomatoes that are ready to eat.
We do not follow a pesticide application schedule in Betty’s garden. Instead, we monitor the garden keeping a lookout for leaves with holes or brown spots. Brown spots on leaves often indicate that some insect is feeding on the underside of the leaves. Turn those leaves over and look for bugs or eggs. If you do not recognize what you find, click this link to compare your bugs to our pictures of eight common garden insects. We very carefully watch our vine crops for striped or spotted cucumber beetles because they will infect the plants with bacterial wilt which can wipe out the entire crop before it even produces any fruits. If you find any dying and wilted vines or parts of vines, completely remove them from the garden and destroy them. Do not add them to your compost pile. If you do, then you will return the bacterial wilt disease organisms to your garden when you spread the compost in the fall. Avoid harvesting vine crops when the vines are wet to prevent spreading the bacterial wilt disease from plant to plant by contact with your hands or clothing.
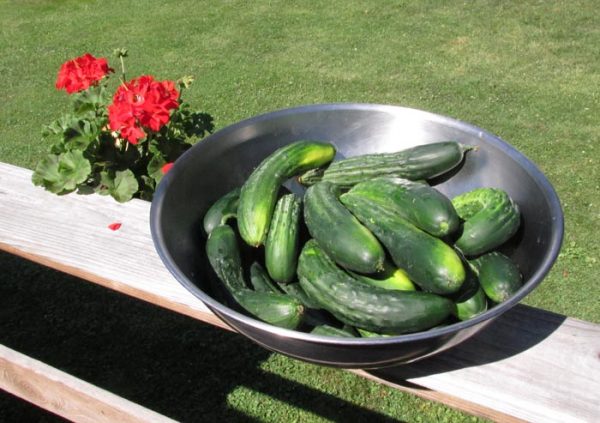
Cucumbers from Betty’s Garden – Harvested on July 9, 2016
The last few weeks have been hot and humid. Thanks to Betty’s diligence with a hoe, our garden has fairly few weeds. However, this is the time of year when many gardeners lose some interest in spending time out in the hot sun weeding the garden because other summertime activities are so much more fun. Those weeds compete with the plants for precious water and soil nutrients. If they mature and go to seed, the weed problem will be multiplied many times over for next year, so it is important to stay vigilant and keep the weeds controlled.
We will end this installment of Betty’s Garden Diary by emphasizing that this document is not an expert authority on the use of pesticides. If you decide to use chemical pesticides or other agrichemicals in your garden, do your homework to protect the environment and keep yourself and those around you safe.
Remember to add your comments and suggestions to make this a community effort. If you are growing some crops that we do not have, please share some information about how to grow those.