

Greetings to those of you who like to play in the dirt! A few years ago, I wrote a year-long series of monthly Weelunk articles about gardening titled “Betty’s Garden Diary.” Since that series ended, folks have been asking when and if I was going to do any more gardening articles, so I have decided to contribute one to Weelunk from time to time. Many thanks for all of your positive comments about the previous gardening series.
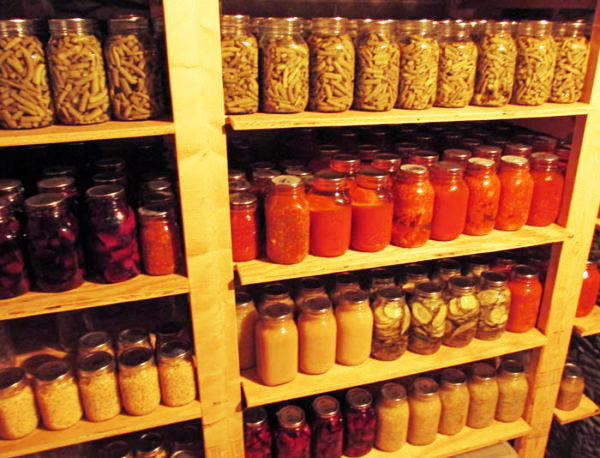
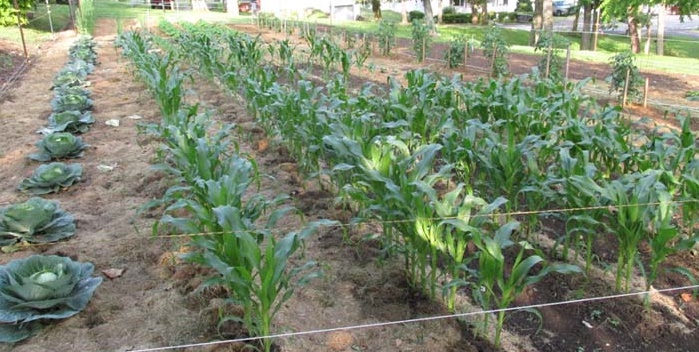
During the last couple of years, we have been blessed with a lot of bounty from our garden, so our freezer and the shelves in our root cellar are filled with frozen and canned vegetables. As a result, we are reducing the size of our garden for next summer. We will likely not plant any green beans because we still have around 100 quarts on the shelves. We also have a lot of tomatoes and homemade sauerkraut, but I still like to grow cabbage and make sauerkraut, so we will plant a few cabbages. Last summer, we grew about 35 heads of cabbage and then gave most of them away to friends. We love fresh sweetcorn right out of the garden, so we are going to plant four small patches of sweetcorn at staggered times so that they come due a few weeks apart. I also have a weakness when it comes to tomatoes, so we will likely plant 15 or 20 plants.
The unusually powerful storms early last spring caused some minor erosion in our garden because of the seven percent slope. To help to prevent that from happening this spring, we planted a cover crop of winter rye last fall. Also, part of the garden is still covered by our turnip patch. Even though we have had some subfreezing weather, the turnips are still good. The deer also like them, and they visit the garden several times a week for a snack of turnip greens and rye. Because of the cover crops, we expect that the soil will take longer to dry out this spring thereby delaying our ability to prepare it for planting by a few weeks. Even so, we are starting to make preparations for growing our bedding plants. Growing our own bedding plants gives us the opportunity to have varieties that are not available from local stores.

If you want to grow your own bedding plants, now is the time to begin. Obviously, you will need to order the seeds. You may want to consult the WVU Extension Service Garden Calendar for the vegetable varieties that they recommend. If you have not already obtained a copy of the WVU Extension Service Garden Calendar, just visit your local County Extension Office or click this link to download the calendar in PDF format. The recommended varieties are near the back of the calendar. Some of our favorite varieties are not listed on the calendar. Here are some of the varieties that we usually grow: Cabbage: Flat Dutch; Tomatoes: Rutgers, Early Treat, and one of the beefsteak varieties; Peppers: California Wonder, Jalapeno and Caballero. Last year, we also grew some Cayenne peppers. Caballero is a very popular version of Poblano chili pepper with a Scoville heat rating of 1,000-2,000. (Jalapeno peppers have a Scoville rating of 2,500-5,000); Peas: Sugar Snap; Green beans: Blue Lake Bush Beans; Sweet Corn: Ambrosia and Early Sunglow. Ambrosia is a super sweet variety, and Early Sunglow is the earliest variety. In addition, we will grow onions from seeds, but do not have a preferred variety. We will order our pepper, tomato, onion and cabbage seeds from one of the online seed catalogs. The seeds for corn, green beans, beefsteak tomatoes and Blue Lakes Bush beans are usually available locally.
By the way, we grow onion plants from seeds because the resulting onions usually keep better than onions grown from sets. Onions are biennials, meaning that they bloom every other year. Most of the onion sets that you buy are already one year old, so they will put up a seed stalk around mid-summer. Although you can remove the seed stalks, the onions often split into two parts. They tend to spoil in the area between the two halves. Onions grown from seed do not put up a seed stalk and do not usually form double bulbs, so they keep better. Some of the local stores sell onion plants if you do not want to grow your own. You can also order them online through the seed catalogs. We will be planting the seeds for our onions early in February, so we will order those seeds by the middle of January. If you grow your onions from sets, be sure to use the double onions first. Our strategy is to grow some onions from sets and some from plants that we grow from seeds.
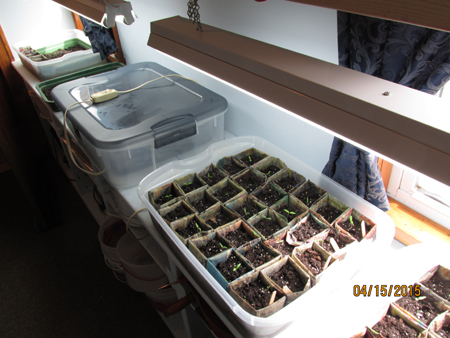
Now is a good time to prepare an indoor area for growing your seedlings. The most important things to consider are heat, light and moisture. You will need to be able to maintain a temperature of around 80 degrees to germinate most seeds quickly. Our solution to that problem was to make a germination station using two large flat transparent plastic boxes. The smaller box just fits inside the larger one. We place the large plastic container with a transparent cover onto a piece of foam board to insulate the bottom. That box serves as a germination chamber. We put the smaller box, containing the soil-filled and seeded pots, inside the germination chamber and then replace the lid on the larger box. We put a thermometer inside the box so that we can monitor the temperature and then replace the lid which keeps the contents from drying out. A heating pad with a control helps us to maintain the 80-degree temperature, which is about ideal for starting most seeds.
Tomatoes, cabbages and peppers need to be started separately since they do not germinate in the same amounts of time. The peppers usually take the longest to come up. Because we will be starting some of our seeds in early March, now is the time to make the preparations for doing so. Our indoor grow area consists of a 2-foot by 10-foot shelf with two 4-foot fluorescent lights hung above it. The picture below shows our indoor grow area. The flats are plastic boxes from a local department store. The flat in the foreground contains tomato plants that were germinated in the newspaper pots. There is a layer of sand under the pots to provide drainage. The flat in the far background was being used to fill pots when this photo was taken. The covered plastic box in the middle was in use as our germination chamber. Although the perspective of the photo doesn’t show it, the flat in the foreground fits completely inside the box that is in use as a germination chamber. The control for the heating pad under the germination box can be seen on top of the box. The cover on the germination box serves to help keep the soil from drying out. Condensation on the underside of the cover is visible in the photo.
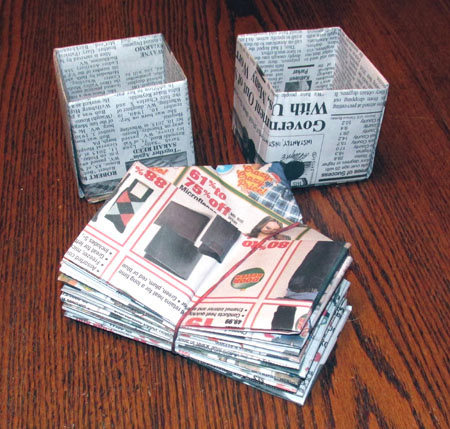
Except for the onions, we plant all of our seeds into 3-inch square pots made from newspaper pages. The photo above shows some of those pots in use. When the time comes, we will arrange the pots in the plastic trays on top of a layer of sand. However, this is the time for making the pots. Making the pots is a little like doing origami. It is fun, but it will take you some time to make 40 or 50 of them, so get started. This YouTube video will show you how to make the pots. Betty came up with a nifty trick to create a small drainage hole in the center of the finished pot. She just cuts off a tiny amount of the folded corner as shown in the video when she is making the pot. If storage space is at a premium, just keep the pots folded flat until you are ready to use them as shown in the picture below. Because we are going to grow quite large bedding plants, the 3-inch pots are the perfect size because they hold a good amount of soil. Because the soil tends to shrink when the pots are watered, we fill them completely before we put in the seeds. Then, we water them, place the seeds and add more soil to cover the seeds.
GET YOUR ENGINES RUNNINNG
As I am writing this, the temperature outside is below freezing and a blanket of snow covers the ground. However, the weather girl predicts a thaw with temperatures in the 40s in a few days. If we actually get a couple of dry days with warmer temperatures, we can take care of a couple of outdoor tasks. One of those is to run the small engines on the outdoor power equipment at least once every month during the winter. When you start the engines, be sure to run them long enough to bring them up to the full operating temperature which usually takes at least 15-20 minutes. Running the engine to full operating temperature is important to prevent moisture from condensing in the exhaust system or elsewhere in the engine. It also helps to lubricate the internal parts of the engine. I like to put about a pint of fuel in the gas tank and then allow the engine to run out of gas so that there is no fuel in the system during storage. It is especially important to run any outdoor equipment that has a battery in order to maintain a full charge in the battery. A discharged battery can actually freeze and burst, causing damage to your equipment. For more information about batteries freezing, click this link. If you store fuel over the winter, be sure to add a good brand of fuel stabilizer to the tank or container to prevent the ethanol from separating from the gasoline and causing damage to the engine. By running the engine until the fuel system is dry, you will also prevent this problem. Visit this page at the Briggs and Stratton website for more information about ethanol-based fuels.
A CAN-DO PROJECT
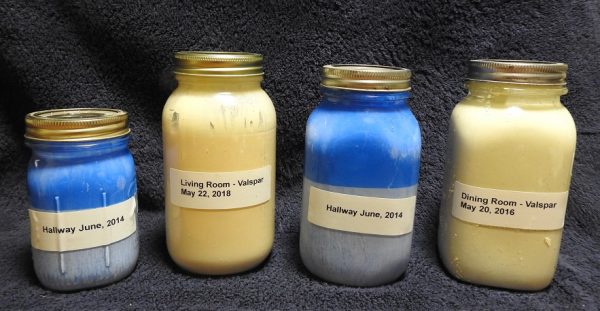
Do you have old paint or old pesticides that you never use? When your winter cabin fever gets bad, take some time and organize those for disposal. Whenever we paint a room in our house, we save the leftover paint in case we need to do a repair or touch-up sometime in the future. However, we do not save the paint in the original can. Instead, we pour it into quart or pint-sized canning jars and cap it using a canning flat and ring. Paint stored in the original can often dries out and becomes unusable, but the tightly capped jar prevents it from drying out although it may become separated after years of storage thereby requiring some mixing before use. We label the jars using standard address labels which are easily available from any office supply retailer. Because nearly all of the interior and exterior paint sold today is latex or water-based, you can simply allow the interior of the paint can to completely dry and then dispose of the can in your normal garbage.
Oil-based paints or varnishes and pesticides require a different kind of disposal by someone who is qualified to do so. Never dump oil based paint or any kind of pesticide down a drain, onto the ground or into any waterway. The Ohio County Solid Waste Authority conducts a hazardous waste collection day every year. Now is a great time to organize those old paints and pesticides for disposal. Wear rubber gloves. Be sure to put your cans of latex paint in one box, your oil-based paints and varnishes, etc., into another box and your old pesticides into a separate box. When you arrive at the OCSWA collection site, their volunteers will remove those from your vehicle for you and place them into the appropriate collection containers. Having the items presorted saves them the extra work of doing so and speeds up the line. The OCSWA hazardous waste collection day last year was in September, but winter is a great time to get those items organized for disposal. If you want more information, you can check out their Facebook page or give them a call. They also have a recycling day in August during which they collect old electronics.
A note from Earl: I am trying to decide if it is worthwhile to repeat more of the gardening series. Be sure to comment and let me know what you think.