


Earl’s note: This is the fourth of a short series about things to do with kids. The activities described in the series are inexpensive and fun things that anyone can do with children. Today, we take photos.
Kids love taking pictures. Since low-end digital cameras are inexpensive, you can get your children or grandchildren started in photography for under $20.This installment of Capers With Kids provides the basic information that you need to help your children to become successful photographers. Section I of this document is full of information about selecting a digital camera. Section II discusses how to avoid some of the common mistakes made by amateur photographers. Section III includes a short description about using some of the features in Adobe Photoshop Elements and Windows Paint to make corrections to your photographs. Section IV consists of a short discussion about composition.
As you teach children about photography, it is important to allow them to use their own creativity. The purpose of this story is to provide some tools to use as you gently guide your children into this great hobby.
SELECTING A DIGITAL CAMERA
Digital cameras come in all shapes and sizes with a price range from a few dollars to a several thousand. When you look at the advertisements for digital cameras, you see words like “megapixels,” “optical zoom” and “digital zoom.” Digital photographs are made up of millions of tiny dots called picture elements or “pixels.”
A megapixel is just over 1 million pixels. Digital camera manufacturers advertise their products based on how many millions of pixels each photograph contains. For example, a six-megapixel camera takes a photograph that is composed of over 6 million pixels while a 10-megapixel camera picture is composed of over 10 million pixels.
Up to a point, more pixels means a better picture. However, pictures containing more pixels have larger files when they are stored onto the SD card in the camera or onto your computer. In general, cameras that take higher megapixel pictures also come with a higher price tag.
Some cameras advertise both a digital zoom and an optical zoom. The optical zoom describes how much the lens of the camera can magnify the picture. For example, a 20x optical zoom functions like a 20x telescope because it makes the picture 20 times larger. If that camera also has a 10x digital zoom, it may seem to making the picture 30 times larger, but the 10x digital zoom actually crops the photograph and magnifies the remainder. Because you can crop the image in either Windows Paint or in Photoshop, the digital zoom is not really necessary.

As you consider digital cameras for children, be sure to find out about the types of batteries and storage media. Most digital cameras today use standard SD memory cards and most laptops have slots for reading SD cards, so SD cards are the preferable storage medium. Some digital cameras require specialized batteries, which are expensive. However, some high-quality, low-cost digital cameras use standard AA batteries. Unless you are buying a high-end camera, look for one that uses the AA batteries. For a very young child, the camera needs to be simple and rugged.
COMMON MISTAKES MADE BY AMATEUR PHOTOGRAPHERS
Three of the most common things that spoil pictures taken by amateur photographers are camera motion, focusing errors and backlighting.
When you are taking pictures in low-light situations, the camera will slow down the shutter in order to get a proper exposure. The slow shutter speed makes the camera especially vulnerable to motion blur. In a brightly lit situation, the shutter speed is so fast that the camera records so little of the motion that it does not impact the quality of the picture, but the slow shutter speed in dimly lit situations keeps the shutter open longer so the motion blurs the photos.
To avoid the problem, remember to use some type of camera support when you are taking pictures in a low-light setting. Also, make sure to squeeze the shutter button rather than vigorously pressing it which tends to move the camera. Using the telephoto lens magnifies the effect of camera motion. The more the telephoto magnifies the image, the more it magnifies the effect of camera motion on the image, so always use some type of camera support when taking long telephoto shots. Some higher-end cameras have image stabilization systems that allow the user to take handheld telephoto shots without motion blur. Images with slight motion blur look like they are slightly out of focus.
If you like to take pictures, then you have plenty of shots that are out of focus. Most digital cameras focus on whatever is in the center of the picture. However, the center of interest is often not in the center of the picture.
As you compose the shot, everything looks fine. When you get home and put the camera card into the computer, you discover that the center of interest is slightly out of focus, but the stuff in the middle of the picture is as sharp as day. Most cellphone cameras and some digital cameras have touch screens that allow you to tap on an area of the scene in the viewfinder, thereby defining it as the primary focus area even if it is not in the center of the screen.
Many digital cameras have a feature where you can put the center of interest in the center of the viewfinder and depress the shutter button halfway, fixing the focus point. Keeping the shutter button depressed halfway, you can then recompose the picture with the center of interest wherever you want it, and it will stay in focus as you depress the shutter button the rest of the way to take the picture.
The third option is to keep the center of interest in the middle of the viewfinder, take the photo and later use Paint or Photoshop Elements to crop the picture to obtain the desired composition. This option works if the camera captures enough megapixels to keep a sharp image after it is cropped.

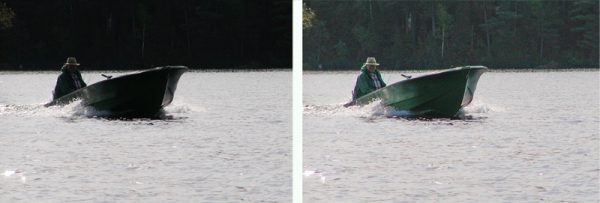
Even experienced photographers have problems with backlighting. Backlighting takes place when there is a bright background or other element in the picture that causes the camera’s light meter to underexpose part of the picture. The usual result is a silhouette with the subject appearing black in the picture, while the bright area of the picture is properly exposed or even washed out.
Often, everything looks fine in the viewfinder when you take the picture, so you must be sensitive to the potential for backlighting when there is a bright source of light in the picture. The best solution is to change the location of the camera so that the bright area is no longer in the shot. However, changing the camera location is not always possible. Surprisingly, the darkened areas of the photo usually contain the data needed to correct the picture using a program like Photoshop Elements.
USING WINDOWS PAINT AND ADOBE PHOTOSHOP ELEMENTS
If you are using a Windows computer, then you have Windows Paint. Windows Paint works great for cropping pictures and for adding captions to pictures. Digital cameras often take huge pictures. When I checked the size of a photo taken with my iPhone, it was 56 inches by 42 inches. The size of the image from my digital camera was 51 inches by 40 inches. Both of those are much larger than I will ever need, so I can use the crop feature in either Paint or Photoshop Elements to improve the composition and effectively perform a digital zoom.
To crop a picture in either program, simply use the rectangular selection marquee to outline the area that you want to keep and then hit “crop.” To open the picture in Paint or Photoshop Elements, simply right-click on the picture and select “open with.”
In Paint, the picture opens full size, so you see only a very small portion of the image. Click the “view” tab and zoom out until the entire picture fits on the screen. To crop the picture in Paint, click the “home” tab and then click “select.” After you use the marquee to outline the part that you want to keep, just click “crop.” After you crop the picture, go back to the “view” tab and click “100 percent.” You will be surprised to see the size of the cropped photo. In effect, you just performed exactly the same function as the digital zoom on the camera.
When you are finished editing the picture, click on the “file” menu and select “save as” so that you can save the edited picture under a name that is different from the name of the original. Then, you will not overwrite the original file. I always save the edited pictures in JPEG format.
My favorite program for working with pictures is Adobe Photoshop Elements. Photoshop Elements costs $99.99. However, it provides a lot of tools that are not included in Paint. One of my favorites is called “shadows and highlights.” It is found under the “enhance” menu.
The “shadows and highlights” function allows the user to lighten the dark areas or to darken the light areas. Sometimes backlit photos can be fixed using this tool as illustrated in the photo above. I also like the “auto haze removal” and “auto color correct” functions. This page from Adobe contains links to several Photoshop Elements tutorials for beginners. As a parent, you are best equipped to judge when your child is ready to use a program like Photoshop Elements, but most kids can master some of the features by the time they are in third or fourth grade.
THE BASICS OF COMPOSITION
Children can learn the basics of photographic composition at a very young age. When I took my first visual design course over 40 years ago, my professor was fond of saying to remember KISS, which stood for “Keep It Simple Stupid.” That philosophy applies when teaching children about composition. Here are a few ideas to share with them.
1. Take TV-style close-ups. We all make the same mistake when we are taking photos of people. We put their face in the center of the photo leaving a huge amount of wasted space from their head to the top of the picture. Instead of putting the face in the center of the picture, zoom in so that the top of the subject’s head is near the top of the frame. A closeup is more interesting, and you will eliminate the wasted space at the top. Remember that you can fix this later by cropping the picture if it is sharply in focus.

2. Use foreground objects to frame the picture and to give depth to the shot. This works especially well when taking photographs of scenery. The foreground objects do not even need to be in focus.

3. Take action shots. Pictures are more interesting when something is happening, so action shots are usually more appealing than static shots. However, pictures of scenery and wildlife are often static shots.

4. Remember the “rule of thirds.” Never divide the photo in half. Instead, divide it into thirds. Let’s say you are photographing the sunset at the beach. Typically, the horizon divides the photo in half, and the sun is in the center. However, the photo is usually more interesting if the picture has the horizon one-third of the way from the top or one-third of the way from the bottom. If the sky is more interesting, make the photo two-thirds sky and one-third water. Then, make sure that the sun is one-third of the way into the picture from either side.
Usually, a picture has a center of interest. Mentally divide the viewfinder into thirds vertically and horizontally. This creates a mental tic-tac-toe board on the screen. Put the center of interest where the thirds lines cross. If someone or something is moving, put them one-third of the way into the picture so they have two-thirds of the picture in front of them.
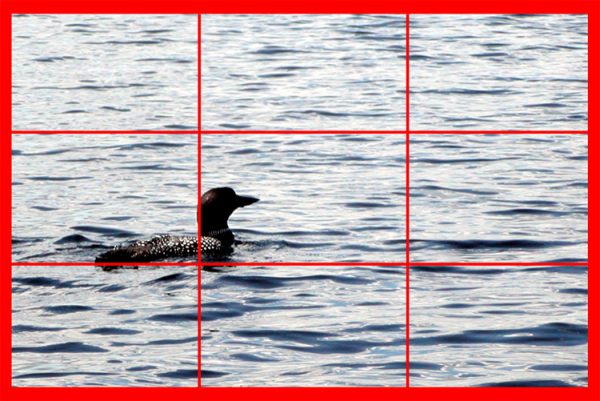
5. Create visual balance. This goes along with the rule of thirds. Pictures that are divided in half are said to have formal balance like the pages of a book. Asymmetrical pictures have informal balance and are usually more interesting. The term “balance” simply means that the visual elements are distributed in the picture in a pleasing manner.

As adults, we sometimes inhibit the creative talents of our children by trying to teach them the “right” way to do things. Putting a camera into the hands of a very young child empowers that child to put his or her creativity to work. As you teach your children about the things outlined in this document, be sure to do so gently and without being critical of their creative efforts. Let their pictures be theirs instead of yours or mine. I hope that you found this story to be useful, and I welcome your comments.